
Quick Answer: In an alumina vs AlN ceramic PCB decision, retain alumina when the complete construction meets the thermal, electrical and mechanical requirements at an acceptable cost. Aluminum nitride is worth evaluating when conduction through the ceramic limits the thermal margin. Compare named grades, thickness, dielectric behavior, CTE, strength and assembly cost; the LED example below shows how to test the thermal benefit without assuming a universal wattage threshold.
Alumina (Al2O3) vs aluminum nitride (AlN) is a material-selection question for ceramic circuits. The practical comparison is whether a proposed grade and construction close a measured performance gap. This page uses an LED assembly as the detailed example; it does not assume that the same temperature, attachment or cost result applies to a power, RF or laser module.
Keep the optical requirement beside the thermal calculation. The desired light output, operating current and package determine the load to be managed. A bare-board comparison without those inputs can encourage an expensive change that has little effect on the finished light engine.
Table of Contents
- Define the LED operating point before choosing alumina or AlN
- Work backward from the allowed solder-point temperature
- Compare Alumina and AlN Properties at the Required Thickness
- Account for the footprint and shared heat sink
- Match metallization to the actual LED assembly
- Protect the light engine beyond the ceramic base
- Compare the accepted module cost and optical result
- Run an alumina-to-AlN comparison build
Define the LED operating point before choosing alumina or AlN
Identify the LED part, operating current and relevant thermal reference point before comparing substrate materials. A wattage printed on a module description is not enough to calculate its junction temperature.
Electrical input is not all heat
An LED converts part of its electrical input into optical output. For a physical heat balance, heat generated within the device is electrical input minus emitted optical power, with the system boundary stated. Light subsequently absorbed by the surrounding fixture can heat other parts of that fixture and should be considered in its thermal design.
Use the power convention that accompanies the selected thermal resistance. Some published thermal characterizations or historical models use electrical input, while other methods account for optical power. Combining a resistance based on one convention with a power from another can distort the estimate. The Cree LED thermal-management note explains the heat path; the selected component data and its measurement method determine the parameters for the actual design.
For a constant-current driver, use the operating current and the relevant forward-voltage condition rather than a nominal catalogue wattage. Consider the required dimming or duty-cycle behavior as well. Average dissipation alone may be insufficient for a short pulse or a thermal transient, so use the component maker’s applicable guidance when the operating mode is not steady state.
Use the package’s named thermal reference point
The Cree XLamp XP-G3 data sheet, revision 21, provides a concrete example: its white LED family lists a typical junction-to-solder-point thermal resistance of 1.1°C/W, with a note identifying JEDEC JESD51-14 measurement. That parameter describes a particular package path and method; it is not the thermal resistance of an alumina or AlN board.
The same product family contains other color variants and operating requirements. Record the actual ordering code and current data-sheet revision rather than borrowing a thermal value from a different emitter. A solder-point measurement also needs the specified location and method; a surface reading elsewhere on the board is not interchangeable.
Work backward from the allowed solder-point temperature
Use the junction-temperature target to determine the solder-point temperature the board must maintain. This makes the ceramic decision testable at a defined location in the assembled light engine.
For an appropriate steady-state model, junction temperature equals solder-point temperature plus heat flowing through the modeled package path multiplied by its thermal resistance. Confirm the component maker’s power convention before using this relationship. Keep the design target below the applicable absolute maximum with the margin required by the product.
Consider an explicitly hypothetical calculation using the XP-G3 white typical resistance above. Assume 2 W of heat in the modeled path and a design junction-temperature target of 105°C. The package temperature rise would be 2 × 1.1 = 2.2°C, leaving a solder-point target of 102.8°C. The 2 W and 105°C values are chosen to demonstrate the method; they are not recommended operating specifications.
Now suppose two hypothetical assemblies produce the following solder-point temperatures under otherwise identical conditions. These are illustrative inputs, not measured QueenEMS results or predictions for every ceramic grade.
| Hypothetical construction | Solder-point temperature | Calculated junction temperature | Comparison with assumed target |
|---|---|---|---|
| Alumina candidate | 104°C | 106.2°C | Above the assumed 105°C target |
| AlN candidate | 95°C | 97.2°C | Below the assumed target |
This example shows what an upgrade would have to accomplish. It does not prove that AlN produces a 9°C reduction in a real module. The actual difference must come from a suitable model or controlled build, and typical package resistance is not a worst-case production guarantee. Include uncertainty and the required thermal margin before approving the design.
The same calculation can support retaining alumina. If its measured solder-point temperature already meets the target with the required margin, a cooler AlN board may provide little practical benefit at the specified operating point. Compare the available alternatives against the requirement, rather than ranking them by temperature alone.
Compare Alumina and AlN Properties at the Required Thickness
Compare named ceramic grades in the dimensions that the product can actually use. Purity percentage and the material family are useful descriptors, but neither is a complete thermal or manufacturing specification.
Evaluate thermal conductivity alongside dielectric constant and loss at the operating frequency, CTE across the temperature range, and flexural strength for the named grade. Kyocera’s ceramic material comparison reports these as separate properties: higher thermal conductivity is not a universal ranking of electrical or mechanical performance. Treat typical values as screening inputs and request the data for the proposed construction.
Power density matters through the heat-source area and the allowable temperature rise. A concentrated device loss may justify evaluating AlN, while a well-spread load with an adequate thermal path may leave alumina sufficient. In RF applications, compare frequency-specific dielectric data as well; in a bonded power module, assess ceramic, copper and attachment expansion together. Neither a material-family name nor a bulk strength number proves that a finished board will survive its mounting and cycling loads.
Keep the alumina option when it meets the required margin, insulation and assembly checks at the lower accepted module cost. Justify AlN with the useful thermal margin or system change it enables, then include metallization, attachment, inspection and any cooling changes in the quotation. The following LED calculation applies that decision to a named package and explicit assumptions.
Kyocera’s AlN material information describes the combination of heat conduction and electrical insulation that makes AlN useful in electronic applications. To use a numerical conductivity in a calculation, obtain the grade-specific value and relevant temperature condition. Do the same for the alumina candidate rather than treating all alumina grades as one fixed number.
Substrate thickness changes the comparison. In a one-dimensional approximation, through-thickness thermal resistance increases with thickness and decreases with conductivity and heat-transfer area. Actual modules also involve spreading and attachment resistance. A conductivity ratio therefore cannot be advertised as the same ratio of junction-temperature improvement.
Specify the surface needed by the assembly process along with the thermal requirement. Flatness, surface condition, metallization adhesion and pad geometry can affect whether a substrate can be assembled consistently. A purity upgrade that does not address the limiting thermal or attachment requirement may add cost without resolving the problem.
Ask the supplier to quote the feasible thickness and grade combinations rather than a generic “alumina upgrade.” Preserve the construction that was tested: substituting a thicker plate or different metallization later can change the basis for the temperature comparison. The approved drawing should identify the grade and dimensions that produced the accepted result.
Account for the footprint and shared heat sink
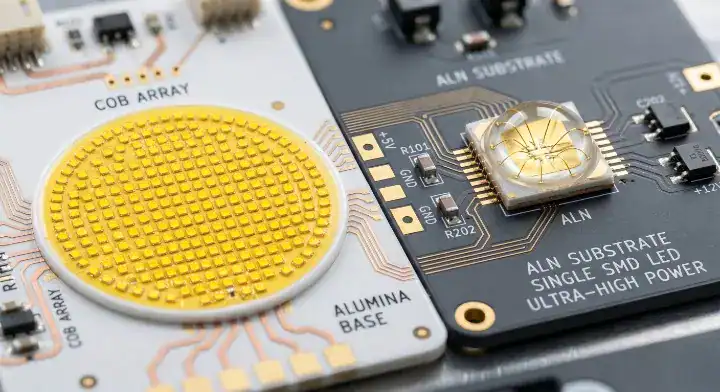
Assess the actual heat-source geometry and mounting interface. A large chip-on-board array and a packaged surface-mount emitter can create different heat distributions, but their package names do not prescribe alumina or AlN.
A distributed array may spread heat over a larger area while still creating hot spots where emitters are crowded or where the heat-sink contact is uneven. A small package may concentrate heat, but its internal thermal pad, attachment and external spreading structure still affect the result. Do not automatically assign alumina to every COB and AlN to every SMD emitter.
With several emitters on one board, consider the shared temperature rise. A package cannot be evaluated as though it is the only heat source if nearby devices heat the same base. Record the operating pattern used in the model or test, including the case in which the relevant channels run together.
Check the interface between the board and heat sink. Its coverage, thickness, flatness and attachment pressure or bond condition can limit heat transfer. An AlN candidate tested with a better thermal interface than the alumina baseline does not isolate the material’s contribution. Either keep that interface unchanged or treat it as a separate design change.
The broader ceramic and metal-core comparison helps when the starting question is whether to change substrate family at all. There is no power-per-chip rule that automatically disqualifies metal-core constructions; a properly specified alternative belongs in the comparison if it meets the same module requirements.
Match metallization to the actual LED assembly
Select the pad and conductor system for the chosen component attachment and current path. The ceramic’s thermal conductivity cannot establish whether the metal pattern is suitable for soldering, wire bonding or die attach.
Finished pads and current paths
DPC, DBC and film metallizations provide different ways to form a circuit. DPC uses a deposited seed and plated build-up rather than only an ultrathin sputtered layer. Bonded-copper constructions offer a different metal geometry. Specify the finished conductor and surface instead of assigning a fixed minimum line width or universal current rating to a process name.
For a packaged LED, use the manufacturer’s land pattern and thermal-pad requirements. For a bare die, confirm the die-attach and bond-pad metallization with the assembly process owner. No evidence here supports making pure gold mandatory for all wire bonds or treating a particular surface-finish standard as a universal die-attach specification.
The thick-film and thin-film circuit comparison discusses those metal-system choices in more detail. Keep the LED material decision connected to its required attachment, rather than expanding it into an unrelated catalogue of ceramic processes.
Reflow and attachment need their own validation
Develop the reflow profile from the solder material, component limits and measured assembly temperatures. Changing the substrate does not authorize an automatic increase in peak temperature. The oven settings are inputs; the temperature history at the relevant joints is the result that must meet the process requirements.
Inspect the attachment features that influence the thermal path. The method and acceptance limits depend on the package and assembly. An image described as “flawless joints” does not establish internal bond quality, and no single inspection image proves that the material change eliminated solder fatigue.
Protect the light engine beyond the ceramic base
Treat moisture, contamination, electrical insulation and mechanical stress as properties of the assembled light engine. A bare ceramic board does not by itself make an outdoor product hermetic or weatherproof.
The package, exposed conductors, solder joints, connectors and enclosure remain part of the environmental problem. Decide on sealing, coating or other protection from the application and the components involved. A low water-absorption value for a ceramic grade does not prove that rain, salt or condensation cannot cause an electrical failure elsewhere in the assembly.
Thermal expansion also needs the complete structure. Ceramic, metallization, die or package, solder and housing do not all expand identically. Selecting a ceramic with a favorable expansion characteristic can help a particular design, but it does not remove every source of mechanical strain or guarantee crack-free operation for a stated number of years.
For high-voltage LED strings, include the surface geometry and the surrounding insulation system. Bulk dielectric strength is not a complete working-voltage rating. Copper edges, contamination, terminals and mounting can affect the result, so qualify the finished configuration using the applicable electrical requirements.
Separate LED lumen maintenance from complete luminaire life. Driver failures, attachment degradation, optical contamination and seal damage can all affect the product even when the emitters remain functional. A substrate comparison should not promise a universal doubling of life for a temperature reduction or claim a fixed outdoor service life without the relevant evidence.

Compare the accepted module cost and optical result
Compare costs after both candidate modules meet the same thermal and optical requirements. A bare-ceramic price difference is only one part of the decision.
Include metallization, assembly, attachment materials, inspection and the heat sink in the cost comparison. Note any changes to the optics or housing caused by a different board thickness. A material that simplifies cooling may justify its cost, while one that produces unused temperature margin may not.
Use actual quotations tied to the drawing and quantity. Do not assign a price per square inch to all alumina grades or promise a fixed saving from avoiding AlN. The ceramic quotation cost discussion provides a separate place to examine quotation scope and cost drivers.
Check the optical result at the specified current and temperature. A cooler board does not establish the final lumen output or color by itself; use the relevant component curves or measured module data. Any claimed efficiency or lifetime improvement needs the corresponding measurements and conditions, not an assumed percentage attached to the material name.
Run an alumina-to-AlN comparison build
Build the two candidates so that the material change can be interpreted. Keep the LED variant, current, copper pattern, attachment and cooling conditions controlled, and record intentional differences rather than letting them disappear into the build history.
A comparison build also needs to distinguish a real temperature advantage from a measurement change. Suppose an illustrative AlN sample looks cooler than alumina in an infrared image, but the specified solder-point measurements are similar. Check the camera emissivity setting and the surface being viewed before treating the image as a material-selection result. Different finishes or exposed surfaces can affect the apparent temperature.
Reconcile the image with a suitable contact measurement at the component maker’s reference location, using the documented attachment method and keeping the sensor clear of the optical beam. Then compare stabilized readings under the same emitting configuration and cooling conditions. If the apparent advantage disappears, the original image does not support paying for the upgrade. If a reproducible difference remains, calculate junction temperature using the correct package parameter and compare its uncertainty with the required margin. Retain the optical-output measurement as well: the selected module must meet the lighting requirement, not simply look cooler in a false-color image.
Follow the initial thermal comparison with the assembly and environmental checks required by the light engine. Keep the acceptance decision tied to the tested thickness, finish and mounting. A later substitute must be assessed against those same requirements.
Record the emitting configuration during each temperature measurement. A multi-channel module tested with only one channel active may not represent the thermal condition that determines the production material choice.
For a quotation comparing alumina and AlN, provide the LED ordering code, thermal-pad layout, operating current, temperature target and heat-sink interface to the QueenEMS ceramic team. Those inputs let the proposed construction and comparison test address a defined thermal gap.
FAQ
Does a 10 W LED always need AlN?
No. Package resistance, dissipated heat, footprint, attachment and cooling determine the temperature. Evaluate the candidate construction against the LED-specific target rather than a universal wattage threshold.
Can alumina remain the better choice after AlN tests cooler?
Yes. Alumina may already meet the required margin and optical result at a lower accepted module cost. The additional cooling must provide a useful benefit to justify the change.
Does changing ceramic allow a hotter reflow profile?
No. The component and solder-process limits still apply. Measure the new assembly’s thermal profile and qualify it within those limits instead of adding an arbitrary temperature increment.
Written by the QueenEMS Engineering Team
Upload your files today · Free DFM check before production · Ship worldwide
Get your PCB prototypes in as fast as 24 hours. We handle FR4, Rogers, and Flex up to 60 layers — free prototypes for 2–4 layer boards, no minimum order.
Just upload your Gerber + BOM — we source every part, assemble, and inspect (AOI + X‑Ray) so you don't have to chase suppliers. Boards ship in as fast as 24 hours.