

Quick answer: An Engineering Change Notice (ECN) is the controlled record that tells everyone what is changing, why it is changing, which products and files are affected, how existing inventory will be handled, what evidence is required, who must approve the change, and when the new revision becomes effective. For PCB assembly, a usable ECN should release one coherent package rather than a loose collection of updated files.
A PCB change can look small on a schematic and still create a large production-control problem. A resistor value change may affect only the BOM and test limits. A footprint change can also affect fabrication data, stencil data, centroid coordinates, assembly drawings, inspection programming, and work already in progress. The purpose of the ECN process is to make those dependencies visible before the contract manufacturer builds the wrong revision.
This article is for PCB designers, hardware engineers, NPI engineers, quality owners, and operations teams who need to move a design change from request to controlled production release.
Table of Contents
- What Is an Engineering Change Notice?
- How Do ECR, ECN, and ECO Differ?
- What Changes Require an ECN?
- What Is the ECN Process from Request to Release?
- What Fields Belong in an ECN Template?
- How Does an ECN Affect Inventory and WIP?
- How Should Component Substitutions Be Controlled?
- What Costs and Schedule Risks Should You Review?
- How Should a CM Implement an Approved ECN?
- How Do You Prevent Revision-Control Errors?
What Is an Engineering Change Notice?
An Engineering Change Notice is a formal, traceable record used to communicate and control a change to a product or its manufacturing information. In PCB work, it connects the engineering decision to the exact assembly, revision, files, inventory, validation, approvals, and implementation point affected by that decision.
The document is important because a PCB is not built from one file. The manufacturer may be working from fabrication data, a BOM, centroid data, drawings, test instructions, approved-vendor information, firmware, and customer-specific acceptance requirements. Updating one item without identifying the others can create a mixed release package.
An ECN should answer six practical questions:
- What is changing?
- Why is the change required?
- Which part numbers, revisions, files, lots, or serial ranges are affected?
- What happens to material and work already in the factory?
- What must be validated and approved?
- At what defined point may the manufacturer build the new revision?
NASA describes configuration management as a way to maintain a known product baseline, control changes, track status, and verify the resulting configuration. The terminology used by a commercial hardware company may differ, but the control principle is the same: the released product definition must remain identifiable before and after a change.
An email can support discussion, but it should not be the only release record. The approved ECN and its attachments should become part of the controlled product history.
How Do ECR, ECN, and ECO Differ?
Organizations do not use ECR, ECN, and ECO in exactly the same way. Some treat an ECN as the approved notification; others use it as the evaluation record and use an Engineering Change Order (ECO) for authorization. Define the terms in your own quality system before asking a contract manufacturer to act on them.
A useful working distinction is:
| Record | Main question | Typical content | Decision state |
|---|---|---|---|
| Engineering Change Request (ECR) | Should we investigate this change? | Problem, proposed change, affected product, requester, urgency | Requested |
| Engineering Change Notice (ECN) | What is changing and what is the impact? | Technical change, affected files, risk, inventory disposition, validation, proposed effective point | Reviewed or approved, depending on the company system |
| Engineering Change Order (ECO) | Is implementation authorized? | Final approvals, released revision, implementation instructions, effective lot/date/serial point | Authorized for execution |
For a small organization, these stages can exist in one controlled form with separate status fields. A larger organization may require different records and approval routes. The critical point is not the document name. It is the separation between requesting, evaluating, approving, releasing, and confirming implementation.
Do not send an order to build the new revision before the impact assessment is complete. The team first needs to know whether the change affects procurement, existing PCB inventory, programmed parts, tooling, inspection, testing, regulatory evidence, or customer approval.
What Changes Require an ECN?
Use the formal change process whenever a change can alter product identity, fit, function, manufacturability, qualification, traceability, or the instructions used by production. A documentation correction may follow a lighter approval route, but it still needs revision control if the corrected document is part of the released build package.
Common PCB and PCBA triggers include:
- schematic, layout, stack-up, copper, drill, mask, or legend changes;
- a BOM value, manufacturer part number, approved-vendor, or lifecycle change;
- component obsolescence or shortage that requires an alternative;
- a footprint, polarity, package, programming, or firmware change;
- correction of a field failure, test escape, or manufacturing defect;
- a DFM finding that changes the product definition;
- a test method, limit, fixture, or inspection-program change;
- a compliance, labeling, customer, or traceability requirement;
- a controlled cost-reduction proposal that changes a released item.

Not every trigger requires the same depth of validation. Correcting a typo that cannot affect manufacturing is different from changing an IC, PCB material, or test threshold. Classify the change by product and process risk, then state the evidence required for that risk. If a problem is discovered during introduction, coordinate the ECN with the NPI release process rather than allowing informal file swaps.
What Is the ECN Process from Request to Release?
A controlled ECN process can be expressed as eight steps. The roles and approval levels may differ by organization, but each step should leave a traceable result.
- Open the request. Identify the requester, product, current revision, problem, proposed change, and reason. Attach objective evidence such as a failure report, supplier notice, DFM finding, or marked drawing.
- Define the affected configuration. List every affected part number, assembly, document, software item, lot, serial range, supplier record, and open order. Determine whether related products reuse the same component or design block.
- Assess impact and risk. Engineering, quality, procurement, operations, and the CM review what must change. Include inventory, WIP, tooling, programming, test, qualification, compliance, schedule, and customer-approval effects.
- Choose the disposition. Decide whether existing material may be used as-is, reworked, returned, segregated, or scrapped. Define the effective point clearly enough that old and new configurations cannot be mixed accidentally.
- Prepare the revised package. Update every affected file and assign the new revision. Run the required DFM review before release rather than correcting individual files after the package has reached production.
- Validate the change. Record the review, analysis, sample build, inspection, test, or qualification evidence required by the change risk. State the acceptance criteria before the validation begins.
- Approve and release. Obtain the approvals defined by the quality system. Release one controlled package and identify the authorized revision, effective lot/date/serial point, and implementation instructions.
- Confirm implementation and close. The CM acknowledges receipt, removes or quarantines superseded instructions, updates its production systems, builds to the approved revision, and returns implementation evidence. Close the ECN only after the released configuration can be verified.
Do not treat approval and implementation as the same event. Approval authorizes the change; implementation evidence shows that the factory actually applied it.
What Fields Belong in an ECN Template?
An ECN template should make missing decisions visible. The following field set works as a practical PCB/PCBA checklist and can be adapted to your document-control system.
| Field group | Required information | Why it matters |
|---|---|---|
| Identity | ECN number, title, requester, owner, dates, status | Provides a unique, searchable record |
| Product scope | Product name, assembly/PCB part numbers, customer, affected variants | Prevents the change from being applied to the wrong item |
| Current and new baseline | Old revision, new revision, current released package, replacement package | Defines the before-and-after configuration |
| Reason and evidence | Problem statement, source of request, failure/supplier/DFM evidence | Separates the observed issue from the proposed solution |
| Change description | Exact old-to-new change, marked drawings, BOM redline, schematic/layout reference | Removes ambiguity about the technical action |
| Affected files | Fabrication data, BOM, centroid data, drawings, test files, firmware, labels, specifications | Prevents partial release of a mixed package |
| Affected production | Open POs, bare boards, components, WIP, finished goods, lots, serial ranges | Shows where the old configuration currently exists |
| Disposition | Use-as-is, rework, return, segregate, scrap, or other approved action | Gives operations an executable instruction |
| Risk and validation | Form/fit/function review, DFM, sample build, inspection, functional test, qualification, acceptance criteria | Connects risk to objective evidence |
| Approvals | Engineering, quality, procurement, operations, customer or regulatory approval where applicable | Shows who authorized the decision |
| Effective point | Effective lot, serial number, work order, PO, or other unambiguous cut-in point | Prevents uncontrolled old/new mixing |
| Implementation evidence | CM acknowledgment, system update, first-unit record, test result, traveler/lot reference | Proves the approved change reached production |
Attach or reference the complete PCB assembly documentation package rather than asking production to assemble a release from different email threads. If a field does not apply, mark it not applicable with a reason instead of leaving it silently blank.
How Does an ECN Affect Inventory and WIP?
Inventory disposition is part of the engineering decision, not an afterthought for the factory. Before approval, identify where the current configuration exists: supplier orders, customer-owned inventory, CM stock, bare PCBs, kitted material, assemblies in process, finished goods, field stock, and repair stock.
Choose a disposition for each affected state:
| Disposition | Use when | Controls to record |
|---|---|---|
| Use as-is | The old configuration remains acceptable for a defined scope | Approved scope, remaining quantity, final allowed lot or order |
| Use until depleted | A controlled running change is permitted | Segregation method, depletion rule, traceability, new-revision cut-in |
| Rework | Existing material can be brought to the approved configuration | Rework instruction, inspection, test, authorization, resulting revision identity |
| Return | Supplier or owner will take back the material | Quantity, location, authorization, shipment/credit reference |
| Segregate or hold | Disposition is not yet approved | Physical and system quarantine, owner, review date |
| Scrap | Material cannot be used or economically reworked | Approval, quantity, traceability, destruction or disposal evidence |
The ECN must also address WIP. A panel may be at fabrication, a stencil may already exist, components may be kitted, or boards may be on an SMT assembly line. State whether work stops immediately, finishes under the old revision, or moves through an approved rework route. The effective point must match what the CM can control in its planning and traceability systems.
How Should Component Substitutions Be Controlled?
A proposed substitute should not be approved only because a distributor labels it compatible. Review form, fit, and function, then extend the review to the risks that matter for the actual circuit and manufacturing process.
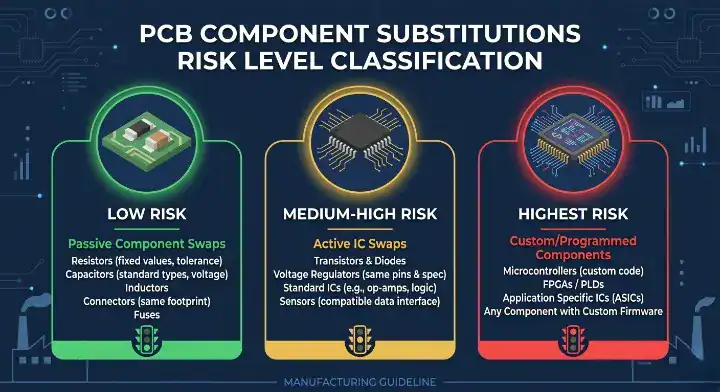
The ECN review should cover:
- package dimensions, land pattern, height, polarity, pinout, and assembly process;
- electrical ratings and the circuit parameters that determine behavior;
- thermal characteristics, derating, power dissipation, and operating environment;
- tolerance, material system, reliability, qualification, and compliance status;
- programming, firmware, configuration, calibration, or security requirements;
- supplier, lifecycle, counterfeit, traceability, and approved-vendor requirements;
- test coverage and the evidence needed before production release.
Passive substitutions can still be application-critical. An apparently similar capacitor, inductor, connector, relay, or protection device may behave differently under voltage, temperature, frequency, load, or mechanical stress. Active and programmed parts normally require a broader review because hidden behavior can extend beyond pin compatibility.
Use the component shortage alternatives process to collect candidate data, but release the selected part through the ECN so the BOM, approved manufacturer list, drawings, test requirements, and inventory disposition stay synchronized. Validation may involve analysis, inspection, a sample build, or functional and environmental testing according to risk; do not impose a universal test method without considering the product.
What Costs and Schedule Risks Should You Review?
The cost of a design change depends on when it is introduced, what has already been purchased or built, and how much validation must be repeated. A useful ECN therefore records cost drivers and schedule dependencies instead of inserting a generic price estimate.

Review these cost categories:
- engineering, document-control, DFM, programming, and test-development effort;
- new bare boards, components, stencils, fixtures, tooling, labels, or packaging;
- cancellation, return, excess-material, rework, segregation, and scrap exposure;
- line changeover, inspection, sample-build, qualification, and approval activity;
- supplier minimums, non-cancellable orders, logistics, and traceability work.
Then review the schedule path. Which revised files must be released first? Are long-lead components or programmed devices affected? Does the new footprint require a new PCB or stencil? Must the customer approve the change? Can old and new revisions be built in parallel, or is a hard stop required? Is a mixed assembly process affected at more than one workstation?
Record estimates supplied by the responsible engineering, procurement, and manufacturing owners. Label assumptions and approval dependencies. Avoid presenting an early estimate as a fixed commitment before the CM has assessed the actual package and inventory state.
How Should a CM Implement an Approved ECN?
The contract manufacturer should receive an approved release package, not a request to discover the change by comparing folders. The package should identify the ECN, new revision, effective point, affected files, disposition instructions, validation requirements, and required implementation evidence.
The CM should then:
- acknowledge receipt and identify the person responsible for implementation;
- review feasibility, open orders, stock, WIP, tooling, programs, and schedule impact;
- quarantine or clearly control superseded material and instructions as required;
- load the approved revision into document, planning, purchasing, and production systems;
- update work instructions, machine programs, inspection, test, labels, and traceability records that are affected;
- brief relevant production and quality personnel;
- build and validate at the approved effective point;
- return the acknowledgment, lot/work-order reference, inspection or test evidence, and any deviation for closure.
If the CM identifies a conflict, it should stop and request clarification rather than choose between revisions. Any temporary deviation should have its own authorization, scope, expiry, and traceability. The ECN owner should confirm that the factory’s response matches the approved disposition before closing the record.
How Do You Prevent Revision-Control Errors?
Revision control fails when individual files are updated without maintaining the identity of the complete released configuration. Prevent that problem by treating the build package as a controlled set.
Use these controls:
- assign a unique part number and revision to each controlled item;
- maintain one authoritative release location with defined access and approval;
- give every ECN and released package a unique identifier;
- make the revision visible inside the relevant document, not only in its filename;
- package mutually compatible fabrication, BOM, centroid, drawing, test, and firmware files together;
- prevent released files from being overwritten without a new controlled revision;
- retain superseded versions and their effective history without leaving them available for accidental production use;
- record which revision, lot, work order, or serial range was actually built;
- audit the CM acknowledgment and implementation evidence before closure.
ISO 10007 identifies configuration identification, change control, status accounting, and audit as core configuration-management activities. ASME Y14.35 addresses controlled revisions of engineering drawings and associated documents. Use the standards and customer requirements applicable to your product, but keep the practical objective simple: an authorized person should be able to determine what was approved, what was built, and when the transition occurred.
FAQ
Does every BOM change require an ECN?
If the BOM is part of the released product definition, changing a value, part number, approved source, or quantity should follow the defined change-control route. The depth of review depends on risk, but the released revision must remain traceable.
Can a component substitution be handled by email?
Email can collect information, but the approved substitute, validation, BOM revision, affected inventory, effective point, and authorization should be captured in the controlled change record.
When should the old revision stop being built?
The ECN should define an unambiguous effective point such as a lot, work order, PO, date combined with inventory conditions, or serial number. Choose a point the CM can enforce and trace.
What should the CM send back after implementation?
At minimum, request acknowledgment of the released package and evidence identifying where the new revision was implemented. Depending on risk, that may include inspection, test, sample-build, rework, lot, or traveler records.
Should the ECN include every revised manufacturing file?
It should attach or reference every affected controlled file and confirm that the released set is coherent. Unaffected files can remain at their existing revision if that relationship is explicit.
If you need a CM to review an approved PCB change package, send the revised files, affected inventory details, and required effective point to QueenEMS for a documented feasibility review.
Sources
- NASA, 6.5 Configuration Management
- NIST, SP 800-128 Rev. 1: Guide for Security-Focused Configuration Management of Information Systems
- ISO, ISO 10007:2017 — Quality management — Guidelines for configuration management
- ASME, Y14.35 — Revision of Engineering Drawings and Associated Documents
By the QueenEMS Engineering Team
Upload your files today · Free DFM check before production · Ship worldwide
Get your PCB prototypes in as fast as 24 hours. We handle FR4, Rogers, and Flex up to 60 layers — free prototypes for 2–4 layer boards, no minimum order.
Just upload your Gerber + BOM — we source every part, assemble, and inspect (AOI + X‑Ray) so you don't have to chase suppliers. Boards ship in as fast as 24 hours.