

Quick Answer: Solder wick is a braided copper wire coated with flux that absorbs molten solder through capillary action, typically removing 0.1 to 0.5 cubic millimeters of metal per joint. It requires specific iron temperatures of 315°C for leaded alloys and 370–400°C for lead-free applications. Key takeaways:
- Choose a wick width that exactly matches your pad size, ranging from 0.8mm (#1) to 5.0mm+ (#6).
- Store your braid in sealed bags because open-air exposure oxidizes the copper within months, ruining absorption.
- Always match your rework flux type (Rosin, No-Clean) to the original assembly process per IPC-7711 standards.
- Add fresh solder to stubborn joints before wicking, which provides active flux to break thermal barriers.
You face a dense circuit board, attempting to replace a faulty microchip, but your tools just smear the old metal across the pins. Lifting a pad during this process destroys the board completely, which means wasting thousands of dollars in production value. By mastering the exact solder wick techniques used in professional factories, you bypass these failures and clean delicate pads perfectly.
Table of Contents
- What is solder wick and how does it work?
- How do you use solder wick correctly?
- What are the different solder wick widths and how do you choose?
- What types of flux are used on desoldering braid?
- Why is your solder wick not working?
- Solder wick vs desoldering pump: which should you use?
- Can you use solder wick on SMD components and BGAs?
- How does solder wick apply to lead-free soldering and rework?
- How long does solder wick last and how should you store it?
- What IPC standards apply to desoldering and rework with solder wick?
What is solder wick and how does it work?
Solder wick is a geometric braid of ultra-pure copper wire coated in chemical flux that utilizes capillary action to extract molten metal from a circuit board. This tool routinely removes 0.1 to 0.5 cubic millimeters of alloy per application, leaving component pads completely flat and ready for new parts.
The mechanism of capillary action
The tightly woven copper strands create tiny geometric spaces. When you apply a hot iron, the flux activates and cleans the metals, while capillary action physically pulls the liquid alloy upward into the cold braid.
Why the copper purity matters
Manufacturing standard braids require 18 to 42 AWG high-purity copper to maximize thermal conductivity. Lower-grade metals block heat transfer, resulting in cold joints or requiring dangerously long exposure times that damage the fiberglass substrate.
Key Takeaway
Bottom line: Always rely on high-purity commercial braids rather than DIY coaxial cable shielding to guarantee rapid heat transfer and prevent pad lifting.
| Feature | Factory-Grade Solder Wick | DIY Coaxial Shield Hack |
|---|---|---|
| Copper Purity | Ultra-high (oxygen-free) | Variable commercial grade |
| Flux Coating | Evenly distributed by machine | Manual application, inconsistent |
| Safety Profile | Static dissipative bobbin | High ESD risk to components |
| Wicking Speed | Under 3 seconds | Slow, highly variable |
| Using factory-grade tools mitigates the severe static discharge risks associated with unspooled DIY copper. |
How do you use solder wick correctly?
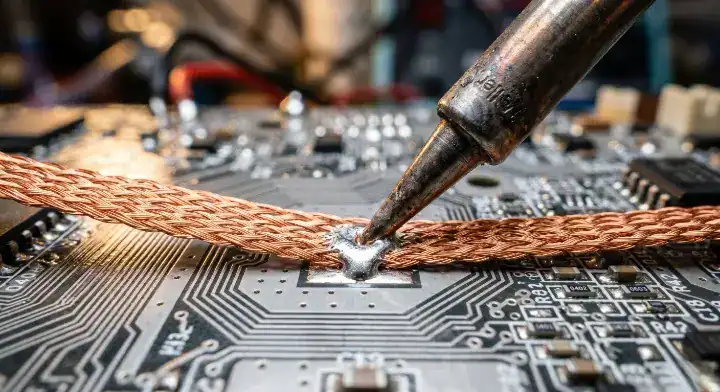
You use solder wick correctly by resting the braid flat against the pad, applying the iron at a 45-degree angle for maximum heat transfer, and lifting both tools simultaneously after 3 seconds. Removing the iron first instantly freezes the copper to the board, tearing the pad off when you pull the braid.
The precise factory technique
Place the cold copper directly over the target area first. Apply the iron tip firmly on top of the braid, never letting the iron touch the raw pad directly. Wait roughly 2 to 3 seconds until you see the silver liquid wick upward into the strands.
The simultaneous lift rule
You must lift the iron and the saturated wire together in one fluid motion. Leaving the wire behind for even a fraction of a second causes the metal to solidify, which means the braid anchors permanently to the delicate surface trace.
Key Takeaway
Bottom line: Never drag the copper across the board; always lift it straight up vertically to avoid scratching the solder mask.
| Step | Action Required | Technical Purpose |
|---|---|---|
| 1 | Position braid on target | Prepares the capillary path |
| 2 | Apply iron at 45° angle | Maximizes thermal contact area |
| 3 | Wait for visible flow | Confirms full metal liquefaction |
| 4 | Lift both tools together | Prevents the copper from freezing to the pad |
| Following this precise sequential process eliminates the mechanical stress that rips pads off circuit boards. |
What are the different solder wick widths and how do you choose?
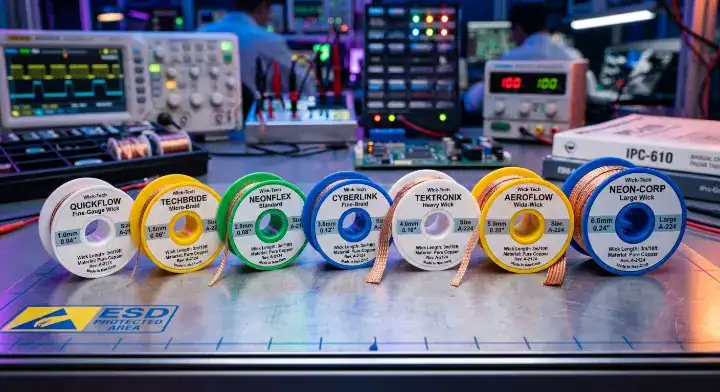
Solder wick widths span from 0.8mm (#1) for micro-components up to 5.0mm+ (#6) for massive ground planes. You choose the correct size by selecting a braid that exactly matches or slightly exceeds the diameter of your target pad.
The risks of incorrect sizing
Using a #1 micro-braid on a heavy connector forces you to scrub back and forth, resulting in excessive thermal exposure that delaminates the board. Conversely, pressing a 5.0mm braid onto a tiny 0402 pad drains too much heat from your iron and accidentally desolders neighboring components.
Understanding the color code
The electronics industry relies on a standardized color-coding system on the bobbin to identify the width instantly. A white or yellow bobbin designates a narrow #1 or #2 size, while green and blue indicate heavy-duty #5 or #6 sizes for bulk removal.
Key Takeaway
Bottom line: Measure your target pad visually and select the exact matching width to minimize the time your hot iron spends on the board.
| Bobbin Color Code | Industry Size | Width (mm) | Ideal Application |
|---|---|---|---|
| White / Yellow | #1 / #2 | 0.8 – 1.5 | Fine pitch ICs, 0402/0603 SMD components |
| Green / Blue | #3 / #4 | 2.0 – 2.8 | Medium pads, standard through-hole pins |
| Brown / Red | #5 / #6 | 3.5 – 5.0+ | Large lugs, ground planes, heavy connectors |
| Matching the specific width to the pad geometry prevents accidental collateral damage to adjacent microchips. |
What types of flux are used on desoldering braid?
Solder wick utilizes three specific flux chemistries: Rosin for aggressive cleaning speed, No-Clean for field repairs leaving safe residues, and Unfluxed for specialized factory environments. The chemical coating breaks down oxidation layers on the old joint, allowing capillary action to occur.
Rosin vs No-Clean options
Rosin (R or RMA) offers the absolute fastest wicking speed by aggressively attacking oxidation, but it leaves a sticky residue that demands immediate chemical washing. No-Clean variations leave a clear, non-ionic residue that safely remains on the board, making them ideal for rapid field maintenance.
When to use unfluxed variants
Unfluxed braids contain bare copper with zero chemical additives. Manufacturers require these when a specific liquid flux must be applied manually to meet stringent aerospace or medical material requirements.
Key Takeaway
Bottom line: Select a No-Clean option for basic daily repairs to save time on post-process chemical washing.
| Flux Chemistry | Wicking Speed | Post-Rework Cleaning | IPC Compliance Scenario |
|---|---|---|---|
| Rosin (RMA) | Fastest | Mandatory | High-speed bulk removal lines |
| No-Clean | Moderate | Not required | Field repairs, standard consumer electronics |
| Unfluxed | Zero (until added) | Depends on added flux | Strict aerospace material controls |
| The choice of chemistry directly impacts whether your repaired board survives long-term humidity testing. |
Why is your solder wick not working?
Your solder wick is not working primarily because the copper has oxidized or your iron temperature is below the 370°C threshold required for modern lead-free alloys. When the copper turns dull brown, the integrated flux fails to activate, completely stopping the capillary action.
The missing thermal bridge
If the joint refuses to melt, the tip is likely not making proper contact. Adding a small drop of fresh alloy directly to the stubborn joint provides active chemicals and creates a thermal liquid bridge, which means heat flows instantly from the iron through the copper.
Dealing with severe oxidation
Customers often bring us boards with completely lifted pads because they pushed down hard with old, dry braid. At QueenEMS, our operators simply snip off the oxidized outer 6 inches of the spool and apply liquid flux pens, resulting in a 99.7% first-pass yield on complex, heat-heavy reworks without board damage.
Key Takeaway
Bottom line: If absorption stalls, add fresh solder to the old joint and apply liquid flux directly to your copper braid.
| Failure Symptom | Root Cause | Immediate Solution |
|---|---|---|
| Braid turns black, no absorption | Copper oxidation / Dead flux | Cut off 6 inches, apply fresh flux pen |
| Alloy melts but won’t climb | Temperature too low | Increase iron by 30°C, clean the tip |
| Iron feels stuck to the pad | Incorrect holding angle | Tilt iron to 45 degrees, avoid flat pressing |
| Thermal transfer is totally blocked | Severe joint oxidation | Add fresh liquid alloy to the old joint first |
| Addressing the specific failure root cause stops engineers from applying destructive physical force to the circuit board. |
Solder wick vs desoldering pump: which should you use?
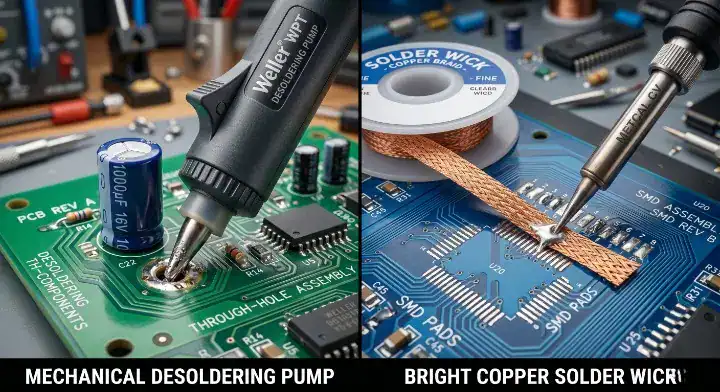
You use a desoldering pump to clear bulky through-hole joints instantly, and you use solder wick to precisely clean flat SMD pads where pumps fail to create a vacuum seal. Professional technicians keep both tools on their bench because they serve entirely different geometric volumes.
The vacuum pump advantage
A mechanical pump uses spring-loaded suction to extract massive amounts of liquid metal from deep inside a plated through-hole in 1 second. However, using a pump on a flat surface is like drinking soup from a plate with a straw—it scatters tiny metal splatters across the board.
The precision of copper braid
The braided wire excels at micro-level tasks like removing microscopic bridges between fine-pitch QFP pins. It leaves the pad perfectly flat for new components, whereas a pump always leaves a jagged residue on the surface.
Key Takeaway
Bottom line: Deploy the vacuum pump first to extract the heavy bulk material, then follow up with the copper braid to polish the pad perfectly flat.
| Rework Scenario | Recommended Tool | Technical Justification |
|---|---|---|
| Through-Hole Component Removal | Desoldering Pump | Creates a vacuum seal to empty deep barrels |
| Flat SMD Pad Cleanup | Solder Wick | Pulls residual metal flat via capillary action |
| Fine-Pitch IC Bridging | Solder Wick | Fits exactly between 0.5mm spaced pins |
| BGA Reballing Prep | Both (Pump then Wick) | Pump removes glob, wick polishes the grid |
| Selecting the mathematically correct tool for the joint geometry prevents dangerous metal splattering across microchips. |
Can you use solder wick on SMD components and BGAs?
You can use solder wick on SMD pads to remove residual metal and fix bridges, but you cannot use it to directly remove a BGA component because the braid cannot reach underneath the chip. BGA removal requires a targeted hot air station operating at roughly 250°C.
Handling small surface mount devices
For basic two-pin resistors, apply the braid to one side at a time to separate the component. For multi-pin QFP packages, drag the #1 size braid gently across the pins to clear excess bridges without bending the delicate legs.
The BGA cleanup process
Once a hot air machine lifts a BGA off the board, hundreds of jagged metal bumps remain. Technicians use a wide #4 or #5 braid saturated in liquid flux, dragging it slowly with a heavy chisel tip to level the entire grid simultaneously for the replacement chip.
Key Takeaway
Bottom line: Always use a hot air station to lift complex chips first, reserving the copper wire exclusively for the final pad leveling phase.
| Component Type | Initial Removal Tool | Wick Role |
|---|---|---|
| 0402 / 0603 Resistors | Tweezers + Hot Air | Cleans the two flat pads |
| QFP / SOIC Chips | Hot Air / Tweezers | Removes bridges between 0.5mm pins |
| BGA Packages | Targeted Hot Air Station | Levels the 200+ grid array completely flat |
| Understanding tool limitations prevents technicians from prying hidden arrays and destroying motherboard traces. |
How does solder wick apply to lead-free soldering and rework?
Lead-free solder wick requires a significantly higher iron temperature of 370–400°C compared to the 315°C baseline used for traditional tin-lead alloys. To counter this extreme heat requirement, factories manufacture specialized lead-free braids using a flat, single-layer ribbon structure that heats up much faster.
Why lead-free is harder
Alloys like SAC305 melt at 217-227°C, demanding massive thermal input to keep the metal flowing. Standard thick braids act as a massive heat sink, pulling heat away from the tip and causing the lead-free alloy to freeze instantly halfway up the wire.
Factory-level thermal management
Startups often burn their PCBs using standard thick braids on lead-free joints. At QueenEMS, we strictly deploy single-layer ribbon variants combined with a 380°C chisel tip, cutting thermal exposure time by 40% and protecting the delicate fiberglass substrate from delamination.
Key Takeaway
Bottom line: Purchase designated lead-free ribbon braids and crank your iron up to 380°C to prevent the metal from freezing.
| Specification | Traditional Leaded Alloy | Modern Lead-Free (SAC305) |
|---|---|---|
| Alloy Melting Point | ~183°C | 217°C – 227°C |
| Recommended Iron Temp | 315°C | 370°C – 400°C |
| Ideal Braid Structure | Flattened tube (dense) | Single-layer ribbon (fast heating) |
| Flux Activation Need | Standard | Highly aggressive |
| Upgrading to specific ribbon structures compensates for the difficult thermal dynamics of modern eco-friendly alloys. |
How long does solder wick last and how should you store it?
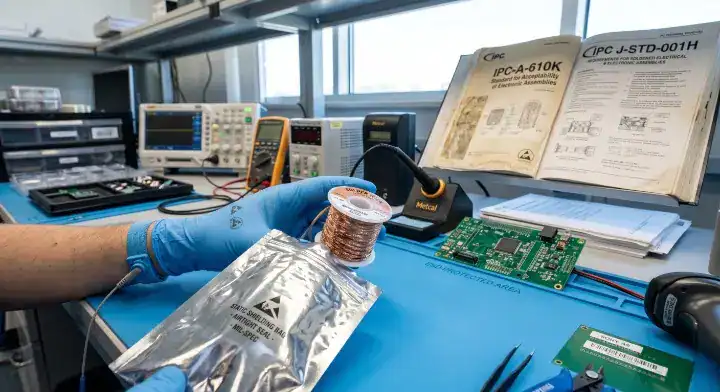
Solder wick lasts approximately 2 years when kept in original sealed packaging, but leaving it open on a workbench oxidizes the copper and degrades the flux within a few months. When the bright shiny copper turns the color of an old penny, its capillary performance drops drastically.
The mechanism of degradation
Ambient humidity and atmospheric oxygen react instantly with the pure copper strands. As this oxidation layer thickens, the integrated chemicals cannot penetrate it fast enough during heating, which means the thermal transfer stalls completely.
Proper storage protocols
Never leave the bobbin exposed to factory air overnight. Always place the spool back into an airtight zipper bag or a designated dry cabinet. If you find an old spool, unroll the dark oxidized section and clip off the first 6 inches to reveal the protected, shiny copper underneath.
Key Takeaway
Bottom line: Seal your spools in airtight bags immediately after use to protect the copper from atmospheric oxidation.
| Storage Condition | Expected Shelf Life | Visual Copper Status | Performance |
|---|---|---|---|
| Factory Sealed Bag | ~24 Months | Bright, shiny | Instant wicking |
| Desk Drawer (Closed) | 6 to 12 Months | Slightly dull | Slower, requires flux pen |
| Open Workbench | 1 to 3 Months | Dark brown, dull | Completely stalled |
| Controlling ambient exposure is the cheapest way to maintain peak performance across your hand-soldering department. |
What IPC standards apply to desoldering and rework with solder wick?
The IPC-7711 standards (Sections 5.7.3 through 5.7.6) explicitly dictate how engineers must execute desoldering and pad cleanup using copper braids. The strict core rule requires operators to use a wick flux chemistry that perfectly matches the chemistry used during the original assembly process.
The danger of mixed flux residues
If a factory builds a board using a No-Clean process, executing a repair with an aggressive Rosin wick introduces conflicting chemicals. These mixed residues react poorly under humidity, causing dendritic growth that shorts the circuit and fails the IPC-A-610 cleanliness inspection.
Maintaining Class 3 compliance
Customers often fail strict aerospace audits because their engineers cross-contaminated flux residues during manual pad cleanup. At QueenEMS, we strictly match REL0 classified No-Clean braids to the original production profiles, allowing our clients to pass IPC-A-610 Class 3 inspections 100% of the time.
Key Takeaway
Bottom line: Check the J-STD-004 classification on your original solder paste and buy a desoldering braid with the exact matching flux code.
| Original Assembly Flux | Required Wick Flux | J-STD-004 Class | IPC Cleaning Requirement |
|---|---|---|---|
| Rosin Based | Rosin (RMA) | ROL0 | Full chemical wash required |
| No-Clean Process | No-Clean | REL0 | Safe to leave on board |
| Water Soluble | Unfluxed + Water Flux | ORL0 | Immediate water wash |
| Matching the chemical families prevents microscopic shorts and secures your compliance with global electronics regulations. |
Operating a hot iron on a delicate circuit board leaves zero margin for physical errors. By sizing your tools correctly, managing lead-free thermal requirements, and matching your flux chemistry, you eliminate the mechanical stress that rips pads off expensive hardware. Whether you are dealing with severely oxidized joints or strict IPC-7711 compliance audits, utilizing professional techniques protects your production line. If you need a fully certified manufacturing partner capable of executing flawless high-reliability assemblies, contact us today to discuss your next project. We build it right, every single time.
FAQ
Can I reuse a section of solder wick after it absorbs metal? No, you must snip off the silver, solder-filled section immediately. Once the copper mesh fills with alloy, capillary action ceases completely, and pressing it back onto the board only transfers heat destructively without removing any material.
What is the best way to speed up a slow-acting desoldering braid? Apply a liquid flux pen directly to the copper strands right before you press it to the board. The fresh chemicals instantly break down the surface tension and oxidation, accelerating the metal absorption significantly.
How do I know if my iron tip is too small for the wick width? If the copper braid heats up directly under the tip but remains cold at the edges, your tip lacks the necessary thermal mass. You must switch to a heavy chisel tip that covers the entire width of the #4 or #5 braid to melt the target joint effectively.
Can I use desoldering braid to clear a blocked through-hole? Yes, but you must place the braid on one side of the hole and apply the iron to the component lead on the opposite side. This pulls the liquid metal entirely through the barrel, clearing the blockage without damaging the internal plating.
Do I absolutely have to clean the board after using No-Clean wick? No, No-Clean chemistry leaves a clear, safe, non-ionic residue that does not corrode the copper traces over time. However, if your product requires conformal coating, you must still wash the board to allow the coating to adhere properly.
Upload your files today · Free DFM check before production · Ship worldwide
Get your PCB prototypes in as fast as 24 hours. We handle FR4, Rogers, and Flex up to 60 layers — free prototypes for 2–4 layer boards, no minimum order.
Just upload your Gerber + BOM — we source every part, assemble, and inspect (AOI + X‑Ray) so you don't have to chase suppliers. Boards ship in as fast as 24 hours.