
Quick Answer: The ideal pcb assembly test strategy transitions from low-cost, zero-fixture methods like Flying Probe for prototypes (costing $0.50–$2/board) to high-throughput ICT fixtures for mass production (costing $0.10–$0.30/board). For stable designs exceeding 2,000 units, a $10,000 ICT investment breaks even by saving over $5 per board in labor. Skipping electrical testing entirely risks a defect escape rate of 200–500 DPMO, potentially leading to field failure costs 100x higher than factory rework.
Key takeaways:
- SPI is the highest ROI inspection: 60–90% of SMT defects originate at the solder paste stage; catching them here costs 10x less than at final test.
- “Testing Included” is a red flag: Most standard quotes only cover AOI (visual); electrical and functional tests usually require separate line items.
- The 100x Rule: Fixing a defect in the factory costs ~$5, but a field recall can exceed $500 per unit in warranty and logistics.
- Fixture Break-even: Custom ICT or FCT jigs typically pay for themselves within 1,000 to 2,000 units depending on board complexity.
Table of Contents
- Why Does Your PCB Assembly Test Strategy Matter More Than You Think?
- What Are the Main Testing Methods for PCB Assembly?
- How Much Does Each PCB Testing Method Actually Cost?
- Which Test Strategy Fits Prototypes, Pilots, and Production?
- How Do You Calculate the Break-Even Point for a Test Fixture Investment?
- What Test Coverage Should You Expect at Each Production Stage?
- What Should You Include in a Test Specification for Your CM?
- How Does Your Test Strategy Affect Yield and Defect Escape Rate?
- What Test-Related Questions Should You Ask Before Choosing a CM?
Choosing a test strategy for PCB assembly is not just a quality decision—it is a financial one. If you over-test early prototypes, you waste thousands on fixtures for a design that might change next week; if you under-test mass production, you risk a catastrophic field recall. According to SMTA data, 60–90% of SMT assembly defects originate at the solder paste printing stage. Implementing a robust pcb assembly test strategy catches these errors early, ensuring your unit economics remain stable as you scale.
Why Does Your PCB Assembly Test Strategy Matter More Than You Think?
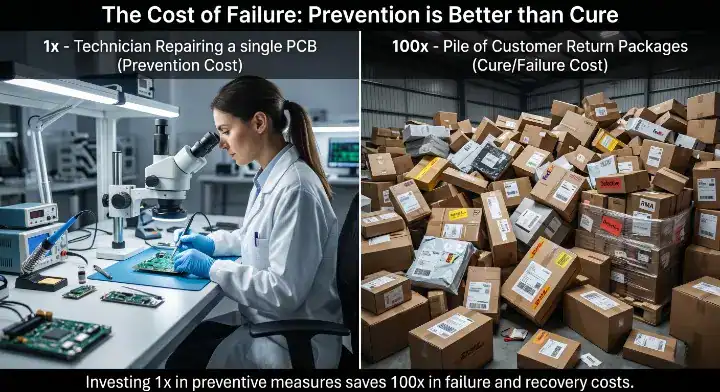
A robust pcb assembly test strategy is the only barrier preventing a $5 factory rework from becoming a $500 field recall. In electronics manufacturing, the “Rule of Tens” applies: the cost of finding a defect increases tenfold at every stage of the product lifecycle—from paste inspection to reflow, to final functional test, and finally to the customer’s hands.
Here is the technical reality:
- Catching a short during SPI (Solder Paste Inspection) costs 1x.
- Catching that same short at Functional Test (FCT) costs 10x in labor and diagnostics.
- Failing to catch it before shipping results in a 100x cost multiplier in warranty claims and brand damage.
Bottom line: Your test strategy dictates your long-term profitability; “saving” money by skipping electrical tests is the most expensive mistake a hardware team can make.
What Are the Main Testing Methods for PCB Assembly?
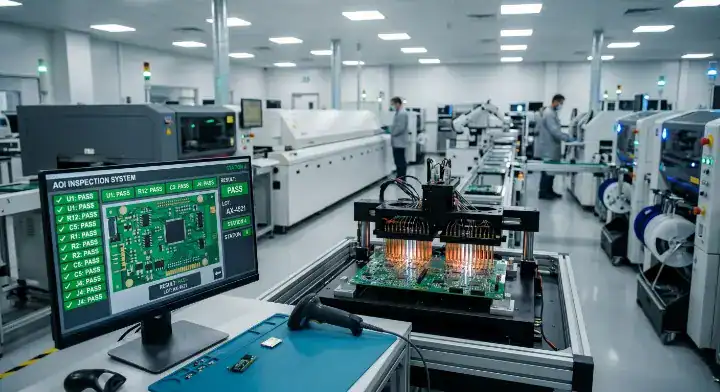
Modern PCBA testing is divided into two categories: Inspection (looking at the board) and Electrical Testing (probing the board). While AOI (Automated Optical Inspection) catches 80–90% of visual defects like missing parts or bridges, only electrical methods like ICT or Functional Testing can verify that the components are actually functioning within spec.
- SPI & AOI: Visual checks for paste volume and component placement.
- X-Ray (AXI): Essential for BGA and QFN packages where joints are hidden.
- Flying Probe: Electrical testing using movable needles; no fixtures required.
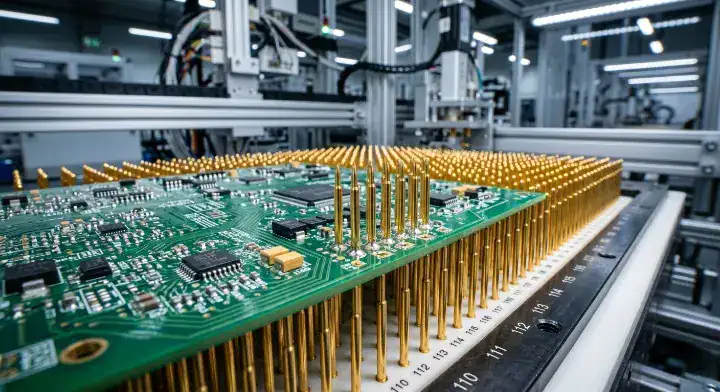
- ICT (In-Circuit Test): A “bed-of-nails” fixture that tests every component simultaneously.
- FCT (Functional Test): Verifies the board performs its intended software/hardware logic.
| Method | What it Catches | Setup Cost | Per-Board Cost | Throughput | Best For |
|---|---|---|---|---|---|
| AOI | Visual (Missing, Polarity) | $0 (Standard) | Included | Fast | All stages |
| X-Ray | Hidden shorts/voids | $0 | $1.50 – $3.00 | Slow | BGA/QFN heavy |
| Flying Probe | Opens, shorts, values | $0 | $0.50 – $2.00 | Very Slow | Prototypes |
| ICT | Component values, shorts | $5k – $20k | $0.10 – $0.30 | Very Fast | 500+ Units |
| FCT | Software/Full Logic | $3k – $15k | $0.50 – $2.00 | Moderate | All production |
Choose Flying Probe if you are building under 50 units and design changes are frequent. Choose ICT if you are scaling past 1,000 units and need the lowest possible cycle time per board.
Bottom line: Inspection tells you the board looks right; electrical testing tells you the board works right. You usually need both.
How Much Does Each PCB Testing Method Actually Cost?
The true pcba testing cost is a combination of one-time NRE (Non-Recurring Engineering) fees for fixtures and the variable labor cost per board. Most customers are surprised to find that “Testing Included” in a standard CM quote often only covers AOI—which provides zero electrical verification.
Typical Cost Breakdown:
- AOI: Included in standard assembly overhead.
- Flying Probe: $0 investment; $1.00–$2.50 per board labor.
- ICT Fixture: $5,000–$15,000 one-time; $0.15–$0.40 per board labor.
- FCT Fixture: $3,000–$12,000 one-time; $1.00–$3.00 per board labor.
Last quarter, a smart home startup asked us for “full testing” on 50 prototypes. An ICT fixture alone would have cost $12,000, adding $240 to every single board. We recommended AOI + Flying Probe instead, costing just $2.50 per board. They found two design errors, fixed them, and only then invested in the $12,000 ICT fixture for their 1,000-unit production run. This phased approach saved them $12,000 in wasted fixture costs for an obsolete design.
Bottom line: Don’t let a “Testing Included” quote fool you; always verify if you are paying for visual inspection or true electrical verification.
Which Test Strategy Fits Prototypes, Pilots, and Production?
Your test strategy must evolve as your volume increases. In the prototype stage, flexibility is king; in mass production, throughput and repeatability are the only metrics that matter. You can compare different methods in our AOI vs X-ray vs ICT inspection comparison for more technical depth.
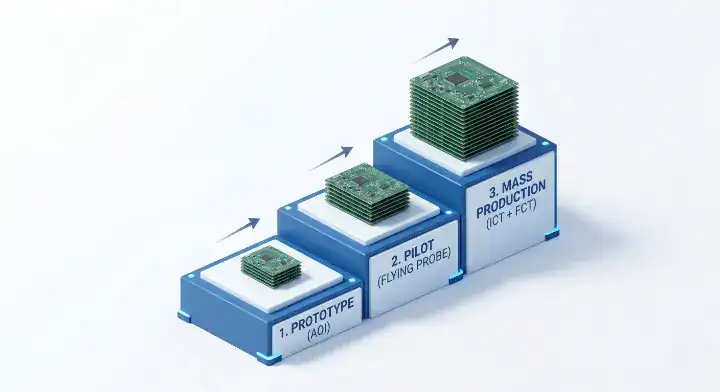
| Production Stage | Volume | Recommended Test Combination | Primary Goal |
|---|---|---|---|
| Prototype | 1-20 | AOI + Manual Bench Test | Design Validation |
| Pilot (NPI) | 50-200 | AOI + Flying Probe + Basic FCT | Process Validation |
| Low-Volume | 200-1,000 | AOI + ICT (Basic) + Automated FCT | Yield Stabilization |
| Mass Prod. | 1,000+ | SPI + AOI + ICT (Full) + FCT + X-Ray | Cost & Defect Escape |
Choose AOI + Flying Probe for the pilot stage to catch assembly errors without locking in a fixed fixture. Choose a full ICT + FCT suite for mass production to minimize the labor-intensive bench testing required by engineers.
Bottom line: Match your testing investment to your design stability—never buy an ICT fixture until your layout is frozen.
How Do You Calculate the Break-Even Point for a Test Fixture Investment?
The decision to buy a test fixture is a simple math problem: does the one-time investment ($I$) save enough in per-board labor ($S$) to pay for itself within the expected volume ($V$)? The formula for pcb test fixture cost break-even is:$$Volume_{Break-Even} = \frac{Fixture\ Investment\ (NRE)}{Manual\ Test\ Cost\ per\ Board – Fixture\ Test\ Cost\ per\ Board}$$
Break-Even Example:
- Fixture Cost: $10,000
- Manual/Flying Probe Test: $6.00 per board (5 mins labor)
- ICT Fixture Test: $0.50 per board (30 seconds labor)
- Savings: $5.50 per board
- Break-Even Volume: $10,000 / $5.50 = 1,818 boards
| Metric | Scenario A (Manual) | Scenario B (Fixture) |
|---|---|---|
| Fixture Cost | $0 | $12,000 |
| Per-Board Labor | $8.00 | $0.30 |
| Total Cost at 500 Units | $4,000 | $12,150 |
| Total Cost at 2,000 Units | $16,000 | $12,600 |
Choose manual testing if your total lifetime volume is under 1,000 units. Choose a custom fixture if you plan to ship 2,000+ units, as the savings will exceed $10,000 by the third production run.
Bottom line: If your annual volume is >1,500 units, the fixture pays for itself in labor savings alone, before even counting the value of better quality.
What Test Coverage Should You Expect at Each Production Stage?
Test coverage refers to the percentage of components and nets that are actually verified by your equipment. A common mistake is assuming AOI provides 100% coverage; it doesn’t. AOI cannot see under BGAs, nor can it detect if a resistor has the wrong internal value despite having the correct marking.
- Prototype (60-70% Coverage): Focuses on “does it boot?” and visual placement.
- Pilot (85-90% Coverage): Introduces Flying Probe to check for shorts/opens on 100% of nets.
- Production (98-99.9% Coverage): Combines ICT (component values) + FCT (logic) + X-Ray (hidden joints).
For critical hardware, refer to our PCB design for test DFT guide to ensure your layout actually allows for high-coverage testing via accessible test points.
Bottom line: High coverage requires planning at the design stage; you cannot achieve 99% coverage on a board with no test points.
What Should You Include in a Test Specification for Your CM?
A vague request for “testing” results in a vague test. To get an accurate quote and reliable results, you must provide a detailed Test Specification document. Without this, your CM might only perform a “power-on” test, which leaves 90% of the board’s logic unverified.
| Item | What to Specify | Why it Matters |
|---|---|---|
| Test Points | Location and Net Names | Allows CM to program ICT/Flying Probe |
| Voltage Limits | Min/Max levels at test nodes | Prevents accidental over-voltage damage |
| FCT Sequence | Step-by-step firmware/logic checks | Ensures repeatable testing by non-engineers |
| Pass/Fail Logs | Data format (CSV, Cloud) | Required for ISO/Medical audit trails |
Bottom line: Your CM is an expert at assembly, not your product’s logic; you must define the “Pass” criteria for functional test pcb assembly.
How Does Your Test Strategy Affect Yield and Defect Escape Rate?
The effectiveness of your test strategy is measured by the Defect Escape Rate—the number of bad boards that “escape” the factory and reach the customer. According to IPC-9261 standards, world-class manufacturing targets a DPMO (Defects Per Million Opportunities) of less than 50.
| Test Combination | Est. Escape Rate (DPMO) | Field Failure Risk |
|---|---|---|
| No Electrical Test | 500+ | Very High |
| AOI Only | 200 – 300 | High |
| AOI + ICT | 20 – 50 | Low |
| AOI + ICT + FCT | < 5 | Negligible |
A medical device client required IPC Class 3 boards for a patient monitor. We deployed SPI, 100% X-Ray for BGAs, and a dual ICT/FCT strategy. Total investment was $22,000 in fixtures. However, their escape rate dropped below 3 DPMO over four production runs. With zero field returns in 18 months, the $22k investment paid for itself by preventing an estimated 20 field failures that would have cost $1,000 each to service under warranty. You can track your success against the first pass yield benchmark.
Bottom line: Test fixtures are an insurance policy; pay a small premium now to avoid a massive claim later.
What Test-Related Questions Should You Ask Before Choosing a CM?
Before signing a contract, you must vet your CM’s internal testing capabilities. Many “low-cost” shops outsource their testing or use outdated equipment that cannot handle 01005 components or high-density BGAs.
- “Do you have in-house 3D SPI and 3D AOI?” (2D is no longer enough for modern pitches).
- “What is your typical First Pass Yield (FPY) for boards of this complexity?”
- “Can you handle in-system firmware flashing and MAC address serialization?”
- “Do you provide a full DFM/DFT report before starting the pilot?”
At QueenEMS, we provide functional testing in the PCBA product lifecycle from EVT through PVT, ensuring your strategy is optimized for every milestone.
Bottom line: A CM that cannot provide detailed yield data or SPI reports is likely hiding a high internal rework rate.
Conclusion
Your PCB assembly test strategy is the foundation of your product’s reputation. While it is tempting to save $10,000 on fixtures during a stressful launch, that saving evaporates the moment the first 50 defective units hit your customers’ desks.
Choose a partner who understands that testing is an investment, not an expense. At QueenEMS, we offer free DFM/DFT reviews on every order and implement 3D AOI + X-Ray as a baseline for all our turnkey clients. We help you scale from a $0-fixture prototype to a high-coverage, automated production line that guarantees a 99.7% first-pass yield.
Ready to lock in your quality? Contact QueenEMS today for a comprehensive test strategy consultation on your next project.
Written by the QueenEMS Engineering Team
FAQ
Q1: How much does PCB assembly testing cost per board? A: It varies by method. AOI is usually included. Flying probe adds $0.50–$2.00 per board with no fixture cost. ICT requires a $5,000–$20,000 one-time fixture but costs only $0.10–$0.30 per board. Functional testing (FCT) adds $0.50–$2.00 per board with a $3,000–$15,000 fixture.
Q2: When should I invest in an ICT test fixture? A: Invest when your annual volume exceeds 500–1,000 boards and your design is frozen. A $10,000 ICT fixture that saves $5 per board in labor breaks even at 2,000 boards. If you are still iterating the design, stay with Flying Probe to avoid making your fixtures obsolete.
Q3: What does ‘testing included’ mean in a PCB assembly quote? A: In 90% of cases, it means AOI (visual inspection) only. It rarely includes electrical testing (ICT/Flying Probe) or Functional Test (FCT). Always ask your CM for a specific breakdown of “Test Coverage” to avoid assuming your boards are electrically verified.
Q4: Can I skip testing to save money on small orders? A: For 5–10 board prototypes, you can rely on AOI and manual bench testing. For 50+ board pilots, skipping electrical testing is dangerous. It raises your escape rate to 200–500 DPMO, meaning 2–5% of your boards could have hidden electrical defects that fail in the field.
Q5: What test coverage is required for IPC Class 3 medical boards? A: Class 3 requires 100% SPI, AOI, X-Ray for all BGAs, and either ICT or Flying Probe, followed by a full FCT. While the total fixture investment may reach $20,000–$30,000, it is mandatory to keep the defect escape rate below 5 DPMO for life-critical hardware.
Upload your files today · Free DFM check before production · Ship worldwide
Get your PCB prototypes in as fast as 24 hours. We handle FR4, Rogers, and Flex up to 60 layers — free prototypes for 2–4 layer boards, no minimum order.
Just upload your Gerber + BOM — we source every part, assemble, and inspect (AOI + X‑Ray) so you don't have to chase suppliers. Boards ship in as fast as 24 hours.