
Quick Answer: Box build assembly transforms a bare printed circuit board into a final, retail-ready product, typically costing between $50 and $150 per unit for simple designs at 100 quantities. Ignoring complete documentation requirements causes 80% of project delays and forces unexpected manual labor costs. Handing the entire electromechanical integration to a turnkey EMS provider completely eliminates these mismatched physical tolerances, saving your team weeks of supply chain management.
Key takeaways:
- The physical PCBA makes up 40% to 60% of the total box build cost, while mechanical enclosures and manual assembly labor make up the rest.
- A complete documentation package requires eight specific files, including an assembly drawing that strictly defines cable routing paths and screw torque specs.
- Simple box builds cost $50–$150 per unit, while complex system integrations with custom wire harnesses exceed $200 to $500 per unit.
- Outsourcing a 1,000-unit production run drops per-unit assembly labor costs by 30% to 50% through custom factory fixture optimization.
Table of Contents
- 1. What Is Box Build Assembly and How Is It Different From PCB Assembly?
- 2. What Components Go Into a Typical Box Build?
- 3. What Does the Box Build Assembly Process Look Like Step by Step?
- 4. How Much Does Box Build Assembly Cost?
- 5. What Documentation Do You Need to Provide Your EMS Partner?
- 6. When Should You Outsource Box Build vs Do It In-House?
- 7. What Quality Tests Should a Box Build Include?
- 8. What Are Common Box Build Mistakes and How Do You Avoid Them?
- 9. How Do You Choose the Right Box Build Assembly Partner?
Taking a bare circuit board and turning it into a final product frustrates many hardware teams. You perfect the electronics, but when it is time to fit the board into a tight metal enclosure, the mounting holes misalign and the wire harnesses suddenly block the cooling fans. Understanding the box build assembly workflow eliminates these physical layout failures before production starts. At QueenEMS, moving clients from fragmented suppliers to our single-roof turnkey integration process saves them an average of 14 days in production delays while maintaining a 99.7% first-pass yield rate.
1. What Is Box Build Assembly and How Is It Different From PCB Assembly?
Box build assembly is the electromechanical integration process that encloses a finished printed circuit board (PCBA) with wiring, a power supply, and a physical casing, turning a semi-finished component into a 100% complete retail product. PCB assembly solely focuses on soldering tiny electronic parts onto a bare fiberglass board, whereas a box build adds the final 15% to 25% of mechanical material costs required to create a functional device you can actually ship to an end user.
Here is the reality: many procurement managers confuse the two terms, expecting a finished device when they only paid for board soldering.
- PCB Assembly Scope: Solder paste application, pick-and-place machine operation, reflow soldering, and automated optical inspection (AOI).
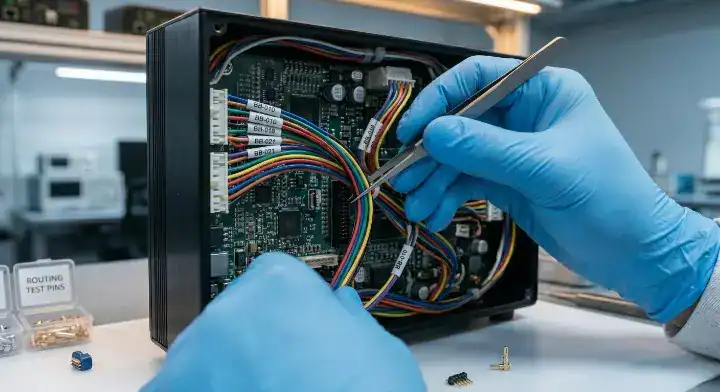
- Box Build Scope: Installing the PCBA into an enclosure, routing wire harnesses, attaching displays, flashing firmware, and packaging the final unit into a branded box.
| Scope Item | PCB Assembly | Box Build Assembly |
|---|---|---|
| Output | Semi-finished PCBA | Retail-ready finished product |
| Primary Process | Automated SMT soldering | Manual electromechanical integration |
| BOM Content | ICs, resistors, capacitors | Enclosures, cables, screws, displays |
| Testing Type | In-Circuit Test (ICT), AOI | Full functional system test, burn-in |
Comparison Anchor: Choose standard PCB assembly if you only need functional motherboards to test your internal circuit logic; choose full box build services if you need a finished product boxed and ready to ship directly to your distributors.
Bottom line: Treat PCB assembly as manufacturing the electronic brain, while the box build creates the physical body; both phases require entirely different factory skill sets and equipment.
2. What Components Go Into a Typical Box Build?
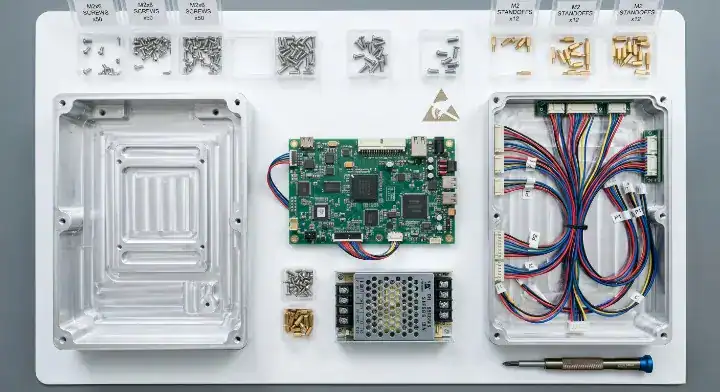
A standard box build requires six core component categories: the populated PCBA, a metal or plastic enclosure, wire harnesses, a power supply unit (PSU), visual displays, and the flashed firmware code. The electronic PCBA accounts for 40% to 60% of the total hardware cost, while the physical enclosure and mechanical mounting hardware make up another 15% to 25% of the bill of materials.
Look at the data: skipping minor items on your list paralyzes the assembly line.
- The Enclosure: Custom injection-molded plastic, CNC machined aluminum, or off-the-shelf sheet metal cases.
- Cable and Harnesses: The physical wires linking multiple boards, power supplies, and external ports.
- Mechanical Hardware: Every single physical screw, standoff, rubber gasket, and thermal pad.
- User Interface Components: LCD screens, membrane keypads, and LED indicators.
- Factory experience: A client submitted a Bill of Materials (BOM) containing only the electronic chips, completely omitting the specialized M2 mounting screws.
- Our solution: We immediately halted the kickoff, identified the exact thread pitch required for their custom aluminum housing, and sourced 10,000 screws locally within 48 hours.
- The result: We prevented a guaranteed two-week delay and delivered the 500-unit batch exactly on the original schedule.
Bottom line: Never send a bare electronic BOM to your assembly partner; a true system integration requires an itemized list documenting every single physical screw, washer, and heat sink.
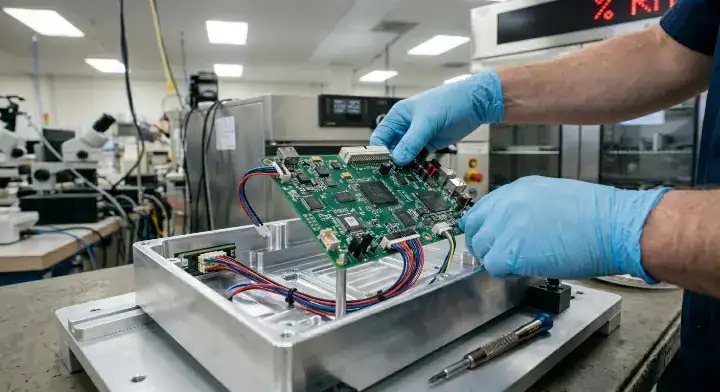
3. What Does the Box Build Assembly Process Look Like Step by Step?
The box build assembly process follows a strict 7-step sequence starting with a Design for Manufacturing (DFM) review and concluding with final retail packaging. A standard integration process takes 3 to 5 days for simple single-board enclosures, while complex multi-board systems demanding custom wire routing require 10 to 14 days of dedicated manual assembly line time.
Consider this workflow:
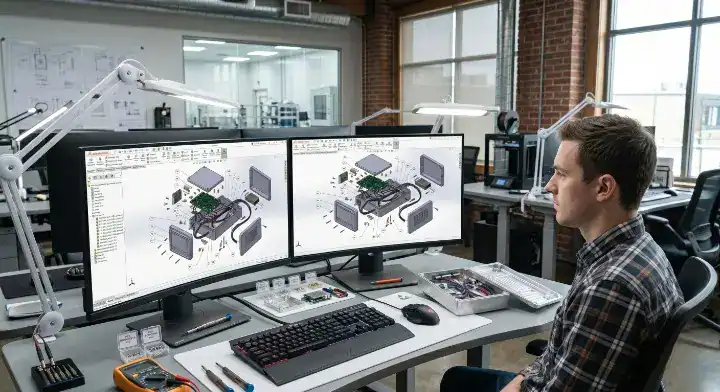
- DFM Review: Engineers check physical clearances, cable lengths, and thermal pathways before touching physical parts.
- Procurement: Buyers source the bare boards, electronic chips, and all mechanical enclosure parts simultaneously.
- PCB Assembly: The factory solders the motherboards and passes them through AOI validation.
- Sub-Assembly: Operators build individual modules, such as attaching the LCD screen to the front bezel.
- Integration: Technicians physically mount the boards, route the wire harnesses, and torque the final screws.
- Testing: The system undergoes firmware flashing and full functional testing.
- Packaging: Operators clean the unit, apply serial number labels, and place it into retail boxes.
Bottom line: A structured, step-by-step methodology prevents catastrophic assembly errors, meaning you must audit your partner’s exact physical workflow before signing any contract.
4. How Much Does Box Build Assembly Cost?
Box build assembly costs typically range from $50 to $150 per unit for simple designs at 100 quantities, while complex systems requiring custom wire harnesses exceed $200 to $500 per unit. The total cost structure breaks down specifically into the PCBA cost (40-60%), the mechanical enclosure (15-25%), cable and harness assemblies (10-15%), manual assembly labor (10-20%), and final system testing (5-10%).
Estimating this budget confuses many procurement teams because quotes vary wildly based on manual labor rates. For prototype runs (5–10 units), slow manual labor pushes prices up significantly. For mid-volume runs (100–500 units), standard predictable pricing applies. For high-volume production (1,000+ units), factories build custom alignment fixtures, instantly dropping your per-unit assembly labor costs by 30% to 50%.
NRE (Non-Recurring Engineering) fees are one-time setup charges covering custom fixture design, test script development, and operator process documentation. For typical box builds, standard NRE runs exactly $500 to $2,000 depending on testing complexity.
| Cost Item | Simple Build ($50-$150) | Complex Build ($200-$500+) | What Drives The Cost? |
|---|---|---|---|
| PCBA | Single 2-layer board | Multiple 6-layer boards | Component count and layer complexity |
| Enclosure | Off-the-shelf plastic box | Custom CNC machined aluminum | Material selection and tooling requirements |
| Assembly Labor | 10 minutes per unit | 45+ minutes per unit | Manual wire routing and screw counts |
| NRE Fees | $500 (Standard setup) | $2,000+ (Custom test fixtures) | Engineering time required for setup |
Comparison Anchor: If you are building a basic IoT environmental sensor, expect mechanical and labor costs under $20 per unit; if you are building an industrial medical monitor, budget significantly more for the intense manual wiring labor.
Bottom line: Always demand an itemized quote explicitly separating the physical manual labor from the material costs so you can identify exactly where your budget goes.
5. What Documentation Do You Need to Provide Your EMS Partner?
A complete box build documentation package requires eight specific files: the complete BOM, bare board Gerber files, 3D assembly drawings, a point-to-point wiring diagram, test specifications, firmware files, packaging requirements, and labeling specifications. Contract manufacturers attribute exactly 80% of all physical assembly delays directly to missing or incomplete customer documentation.
Pay attention to this detail: sending a basic BOM and Gerber files is never enough to get a finished product. If you fail to supply an assembly drawing, factory operators will guess how to connect the internal cables, frequently plugging them in backward and shorting out the entire motherboard.
- Assembly Drawings: Must contain a visual exploded view, exact screw torque specifications, safe cable routing paths, and connector keying orientations.
- Test Specifications: Must explicitly define the exact pass/fail criteria for every single test point, the functional test sequence, and the burn-in duration.
- Common Mistake: Engineering teams forget to list the mechanical parts (screws, standoffs, thermal paste) on the master BOM, instantly causing a two-week procurement delay while the factory hunts down the missing hardware.
| Document Type | Required / Optional | Accepted Format | Common Mistakes |
|---|---|---|---|
| Complete BOM | Required | Excel / CSV | Missing screws and mechanical hardware |
| Assembly Drawing | Required | PDF / 3D STEP | Lacking explicit cable routing paths |
| Test Specification | Required | Word / PDF | No definitive pass/fail criteria listed |
| Wiring Diagram | Required if cables used | Ignoring connector pinout orientation |
Comparison Anchor: If you submit a complete 3D drawing package showing exact screw torque limits, assembly starts immediately; if you only send a component list, expect a minimum two-week delay for engineering clarification emails.
Bottom line: An assembly drawing must explicitly map out cable routing paths and connector orientations to stop factory operators from guessing and making catastrophic wiring errors.
6. When Should You Outsource Box Build vs Do It In-House?
Outsourcing a box build makes financial sense when your production volume exceeds 100 units per month, as contract manufacturers leverage automated tooling and trained labor to cut assembly times by up to 40%. Doing the integration in-house only works efficiently for early prototyping phases (1 to 10 units) where your internal engineering team needs immediate physical feedback on how the board fits into the 3D-printed enclosure.
Think about your resources: managing ten different suppliers drains your operational bandwidth.
- In-House Assembly: Keeps IP tightly guarded and allows engineers to make instant physical adjustments during the alpha testing phase.
- Outsourced Assembly: Provides a consolidated supply chain, places a single point of accountability on the EMS provider, and frees your internal team to focus entirely on next-generation product design. This is especially true for projects requiring heavy through-hole assembly where manual soldering tools take up massive factory floor space.
| Factor | In-House Advantage | Outsource Advantage |
|---|---|---|
| Volume Limit | Best for 1-10 prototypes | Best for 100+ production runs |
| Design Changes | Instant physical modification | Requires formal ECN documentation |
| Labor Cost | Expensive engineering salaries | Cheap, optimized factory operator rates |
| Accountability | Blame spread across suppliers | Single EMS partner takes full responsibility |
Comparison Anchor: Choose in-house integration if your mechanical design changes daily and you only need 5 desk prototypes; choose outsourcing if your design is locked and you demand a single point of accountability for a 500-unit production run.
Bottom line: Handing the final integration to a turnkey provider eliminates the massive overhead cost of managing a dozen different mechanical and electronic suppliers yourself.
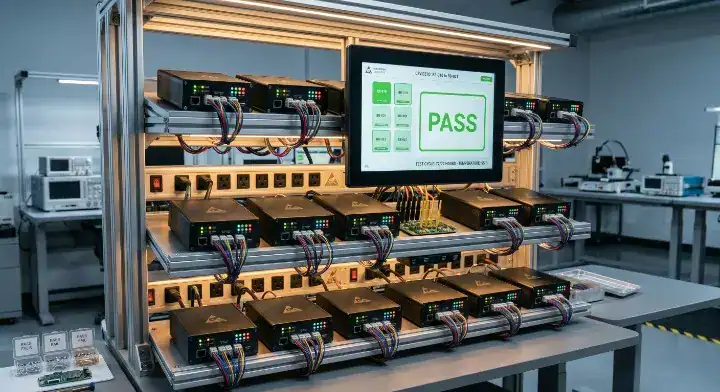
7. What Quality Tests Should a Box Build Include?
A reliable box build requires three mandatory quality testing phases: a 100% functional test checking all I/O ports, a burn-in test running the device at 40°C for 24 hours, and specific environmental tests like drop or vibration checks. These electromechanical validation steps catch the 5% to 8% of hidden failures that only appear after the PCBA is physically bolted tightly into the final metal chassis.
Do not ignore this step: bolting a board down induces physical stress that can crack solder joints.
- Functional Testing: Flashing the firmware and verifying that the buttons, screens, and wireless antennas operate correctly.
- Burn-In Testing: Powering the enclosed unit under elevated temperatures to force infant mortality failures to happen inside the factory, not in your customer’s hands.
- Environmental Testing: Placing the finished box on a vibration table to verify the internal wire harnesses will not shake loose during shipping. Projects using mixed technology assembly absolutely require this to test the heavy THT components.
- Factory experience: A consumer electronics client declined burn-in testing to save $2 per unit. The devices overheated and failed in the field because the enclosure trapped unexpected heat.
- Our solution: We redesigned the test protocol to include a mandatory 12-hour thermal burn-in under heavy processor load.
- The result: We identified the thermal limit immediately, reducing field return rates from a disastrous 4% down to 0.1% on the next batch.
Bottom line: Never authorize a final product shipment without a formal test specification document that clearly defines the exact numerical pass and fail criteria for every single test point.
8. What Are Common Box Build Mistakes and How Do You Avoid Them?
The top three reasons box build projects suffer delays are incomplete customer documentation (causing 40% of delays), raw component availability issues (30%), and unapproved design changes mid-production (20%). The most severe budget overrun happens when hardware teams drastically underestimate the complex manual labor required for wire routing inside tight physical enclosures.
How do you fix this? Manual wiring labor is the single most expensive line item in a box build.
- Cost Overrun Trap: Failing to plan exact cable lengths. If wires are too short, they snap; if they are too long, operators spend 10 extra minutes per unit trying to fold them safely away from hot microprocessors.
- Thermal Management Failures: Realizing the enclosure traps too much heat only after production begins. Adding a custom heat sink or a cooling fan at the last minute skyrockets your BOM cost and demands heavy assembly rework.
To prevent these disasters, you must implement strict preventative strategies. Conduct a massive Design for Manufacturing (DFM) review at the design stage. Establish a formal Engineering Change Notice (ECN) process so no one alters the design casually. Finally, enforce a strict BOM freeze date before the procurement team issues a single purchase order.
Bottom line: Lock your 3D design and freeze your BOM entirely before requesting factory quotes; changing a mechanical specification mid-production instantly triggers severe cost penalties and massive schedule delays.
9. How Do You Choose the Right Box Build Assembly Partner?
Choosing the right assembly partner requires verifying they own the physical equipment for your specific volume, typically meaning they operate a dedicated mechanical assembly line entirely separate from their automated SMT soldering machines. A highly capable manufacturing partner will provide a dedicated project manager and demonstrate a verifiable history of shipping complex systems on time.
Ask these hard questions:
- Do you have dedicated mechanical assembly lines? SMT operators are not trained to route complex wire harnesses.
- Can you handle mechanical supply chain sourcing? A true turnkey partner sources the custom plastics and CNC metals for you.
- What is your ECN handling process? You need a partner who can quickly adapt to an engineering change without halting the entire factory floor for a month.
Bottom line: Select a manufacturing partner who treats physical cable routing and thermal management with the exact same engineering rigor as the bare circuit board design.
Scale Your Finished Product Production with Confidence
Bridging the gap between a populated circuit board and a retail-ready physical product is the hardest transition in hardware development. Missing documentation, tangled wire harnesses, and mismatched mounting holes destroy your profit margins and delay your market launch by weeks. You need a partner who understands that the final electromechanical integration dictates the success of your entire project.
At QueenEMS, we bring the entire process under one roof. From the initial DFM review of your 3D enclosure to the final 24-hour thermal burn-in test, our dedicated mechanical assembly teams execute your exact specifications. By consolidating your PCB fabrication, component sourcing, and final box build with us, you eliminate supplier blame games and receive a 100% tested, retail-ready product.
Stop losing sleep over manual assembly errors and supply chain bottlenecks. Reach out and contact us today to request an itemized box build quote, or learn more about our 99.7% first-pass yield quality systems.
Written by the QueenEMS Engineering Team
FAQ
1. Can I use different suppliers for the PCBA and the final box build? Yes, but splitting the supply chain increases your project risk exponentially. If you use one factory for the electronics and another for the mechanical box build, any physical fitment issue instantly turns into a blame game between the two suppliers. Using a single turnkey EMS provider guarantees one point of accountability and speeds up your delivery timeline.
2. How long does a typical box build project take? It depends on the complexity, but a standard box build adds 3 to 10 days to your standard PCB assembly timeline. A simple enclosure with one board takes roughly 3 days, while a complex system requiring intricate wire harnesses, multiple sub-assemblies, and a 24-hour burn-in test will take up to 14 days of dedicated factory time.
3. Does my factory test the final assembled product? Yes, if you provide them with a detailed test specification document. A qualified factory will absolutely run functional tests, flash your firmware, and verify the physical buttons and screens work after the board is mounted in the enclosure. You must supply the exact pass/fail parameters before production begins to guarantee they test what matters most to your users.
Upload your files today · Free DFM check before production · Ship worldwide
Get your PCB prototypes in as fast as 24 hours. We handle FR4, Rogers, and Flex up to 60 layers — free prototypes for 2–4 layer boards, no minimum order.
Just upload your Gerber + BOM — we source every part, assemble, and inspect (AOI + X‑Ray) so you don't have to chase suppliers. Boards ship in as fast as 24 hours.