
Quick Answer: To transfer PCB assembly to a new manufacturer successfully, expect an 8-to-12-week transition period and roughly $1,500 to $5,000 in new setup fees (NRE). The key to preventing production downtime is securing your complete manufacturing data package upfront—including Gerbers, Centroid files, and approved vendor lists (AVL)—before alerting your current supplier about the move.
Key takeaways:
- Missing manufacturing files cause 80% of transfer delays; always build your document package before terminating your current contract.
- A 4-week parallel run between your old and new contract manufacturer (CM) prevents stockouts during the switch.
- Shipping used stencils to your new CM rarely saves money; cutting new ones locally typically costs just $150–$300 and prevents printing defects.
- Open purchase orders (POs) and buffer stock obligations with your old CM must be audited and transferred legally before signing the exit agreement.
Table of Contents
- Why Do Companies Switch PCB Assembly Manufacturers?
- What Files and Documents Do You Need Before Starting the Transfer?
- How to Evaluate and Qualify a New PCBA Manufacturer Before Committing?
- What Is the Step-by-Step Process for Transferring PCB Assembly Production?
- How Do You Handle Component Inventory and Open Purchase Orders During the Transition?
- How to Run a First Article Build to Validate the New Manufacturer?
- What Are the Most Common Mistakes That Cause Downtime During a CM Switch?
- How Long Does a Typical PCB Assembly Transfer Take?
- FAQ
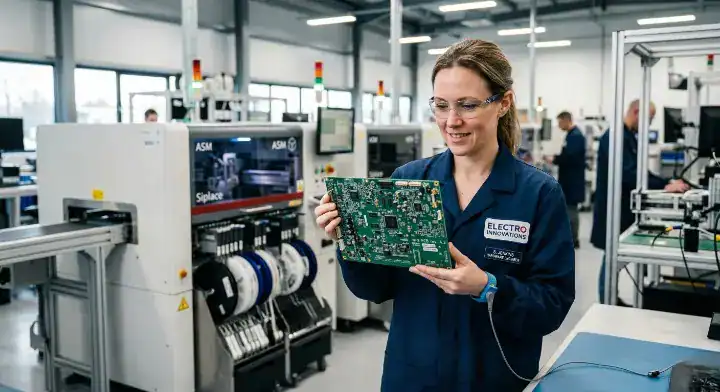
You’ve finally decided to pull the plug on your current contract manufacturer. Lead times are slipping, quality defects are climbing, and communication feels like shouting into a void. If you mishandle the transition, you risk massive production delays, legal battles over component inventory, and hundreds of thousands of dollars in lost revenue. After processing 3,200+ assembly orders last year and rescuing dozens of stranded hardware projects, we know exactly how to execute this move safely. Whether you are using turnkey and consigned assembly models, this guide breaks down the exact steps to transfer PCB assembly to a new manufacturer without stopping your supply chain.
Why Do Companies Switch PCB Assembly Manufacturers?
A company typically decides to switch PCB assembly suppliers when their current defect rate exceeds 3%, or when scaling production exposes severe capacity limitations at their existing factory. This decision is rarely made lightly, as moving a complex bill of materials (BOM) involves significant engineering effort and upfront costs.
When analyzing why hardware teams move production, the data usually points to specific breaking points:
- Recurring quality defects (e.g., bridging on fine-pitch components, reversed diodes) that the current CM fails to fix permanently.
- Unjustified price hikes of 15% or more on legacy products without corresponding BOM cost increases.
- Inability to scale from prototype volumes (100 units) to mass production (10,000+ units) reliably.
- Poor communication, such as taking 72 hours to respond to critical engineering change orders (ECOs).
But here’s the catch: Many companies wait too long to initiate the move. You should start looking for a secondary supplier the moment you spot systemic process failures, not after a catastrophic batch failure ruins your quarterly targets.
The Hidden Costs of Staying
Sticking with an underperforming CM drains your resources silently. You end up spending more on your own internal quality control (QC) team to double-check their work. If your current factory forces you to manually inspect every board because their automated optical inspection (AOI) programming is flawed, you are bleeding money.
Trigger Points for Immediate Action
Not all supplier issues require a complete transfer. A single late delivery might just be a supply chain hiccup. However, if your CM alters your approved vendor list (AVL) and swaps a critical power management IC for a cheaper alternative without your written approval, that is an immediate termination trigger.
Decision Framework: When to Fix vs. When to Flee
| Warning Sign | Severity | Recommended Action |
|---|---|---|
| Single batch delayed by 1 week | Low | Issue Corrective Action Report (CAR) |
| Yield rate drops below 95% | Medium | Audit their SMT line processes |
| Unauthorized component substitutions | Critical | Begin CM transfer process immediately |
| CM refuses to share test data | Critical | Begin CM transfer process immediately |
If your CM triggers a critical warning sign, do not attempt to fix the relationship; your intellectual property and product reliability are already compromised.
Bottom line: If your current manufacturer costs you more in management time and rework than you save on their initial unit price, it is time to switch your assembly partner immediately.
What Files and Documents Do You Need Before Starting the Transfer?
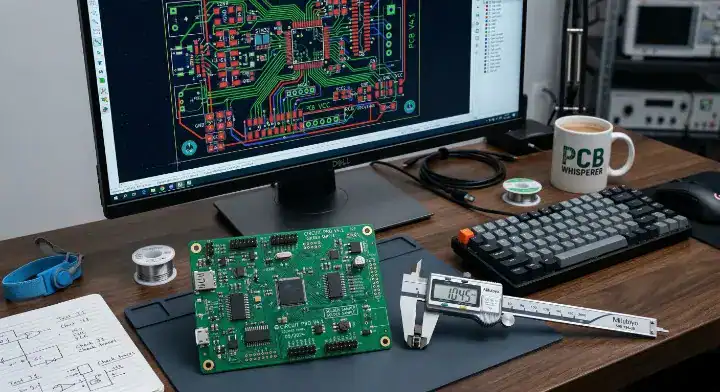
To successfully transfer PCB assembly to a new manufacturer, you must export and verify a complete data package consisting of at least 12 distinct manufacturing files, including native CAD files, Gerbers, and exact pick-and-place coordinates. Without this exact data, your new factory will be guessing at your specifications, leading to costly prototype iterations.
A common nightmare for hardware engineers is discovering that the Gerber files on their local hard drive do not match the actual boards coming off the production line. Your old CM might have made “undocumented process tweaks” on the shop floor to fix a footprint issue, but they never updated your master files.
The Complete Transfer Package Checklist
You cannot rely on a PDF schematic to move production. You need raw, machine-readable data. If your current CM pushes back on providing these files, remind them that you own the intellectual property for your design. Getting the necessary PCB assembly quote files together is your very first operational step.
What If You Lost Critical Files?
If your CM refuses to cooperate or you simply lost the centroid data, you are not entirely stuck. You can ask the new CM to physically reverse-engineer a “Golden Sample” (a perfectly working board from your current inventory). They can extract the X/Y coordinate data using an AOI machine, though this adds 3 to 5 days to your timeline and introduces a small margin of error.
Factory Veteran View: The Problem: 70% of clients transferring from another factory arrive with mismatched Gerber and centroid files because their previous CM made hidden footprint adjustments. Our Solution: We deploy a 24-hour engineering scrub comparing physical golden samples against your provided data. The Result: This process catches 95% of component placement errors and footprint mismatches before we order a single new stencil or bare board.
Document Transfer Breakdown
| Document Type | Who Owns/Provides It | Is It Mandatory? | Action if Missing |
|---|---|---|---|
| Gerber / ODB++ / IPC-2581 | You (OEM) | Mandatory | Export from native CAD software |
| Centroid (Pick & Place) File | You (OEM) | Mandatory | Reverse-engineer from Golden Sample |
| BOM with Approved Vendor List | You (OEM) | Mandatory | Rebuild manually from schematics |
| Test Procedures & ICT Programs | Old CM / You | Mandatory | Rewrite based on functional requirements |
| Reflow Profile Data | Old CM | Optional | New CM will create a custom profile |
| Stencil Data / Step Files | Old CM | Optional | Generate new data from Gerber paste layer |
Do not start the transfer negotiations until every mandatory document in this table is safely stored on your own company servers.
Bottom line: Never notify your current manufacturer that you are leaving until you have fully verified that your internal file versions perfectly match the physical boards they are currently shipping you.
How to Evaluate and Qualify a New PCBA Manufacturer Before Committing?
You should qualify a new PCBA manufacturer by running a rigid audit of their equipment capabilities, financial stability, and quality control procedures, prioritizing factories that offer transparent costing and dedicated account management. Rushing into a new contract based purely on a lower per-board price will land you in the exact same mess you are trying to escape.
When you choose a PCB manufacturer, you need to look beyond their marketing materials. Any factory can buy a high-end Yamaha or Fuji surface mount technology (SMT) line. The real difference lies in their engineering processes, material handling, and how they manage component traceability.
Red Flags to Watch Out For
If a prospective CM refuses to sign a mutual Non-Disclosure Agreement (NDA) before reviewing your Gerbers, walk away. Another massive red flag is a quote that comes back in 2 hours with zero engineering questions. Complex boards require Design for Manufacturing (DFM) reviews; if they don’t ask about your blind vias or BGA pitch, they aren’t looking closely enough.
The Plant Audit Process
If possible, visit the facility physically. Look at their component storage: are moisture-sensitive devices (MSDs) kept in dry cabinets? Check their testing area to see if 3D AOI and X-Ray inspection are standard procedures or expensive add-ons. If you cannot visit, demand a live video tour of the SMT line while it is running.
Now, here’s the part that surprises most customers: The biggest indicator of a factory’s reliability is their employee turnover rate. A factory with 30% annual turnover means inexperienced operators are constantly handling your products, heavily increasing the risk of handling defects and misplaced parts.
Upload your BOM for a free DFM check with our engineering team to see how a proper technical review should look before production begins.
Supplier Qualification Matrix
| Evaluation Dimension | Weight | Scoring Criteria (Red Flag vs. Green Flag) |
|---|---|---|
| NPI to Volume Scaling | 20% | Red: Only does prototypes. Green: Handles 10 to 10,000+ units. |
| Engineering Support | 25% | Red: No DFM feedback. Green: Provides detailed DFM/DFA reports. |
| Quality Control Tech | 25% | Red: Manual visual inspection. Green: 3D AOI & X-Ray on all BGAs. |
| Supply Chain Network | 20% | Red: Buys from grey market. Green: Franchised distributors only. |
| Communication | 10% | Red: Takes 3+ days to reply. Green: 24-hour response time. |
Score your potential new partners against this matrix; any factory failing the Quality Control or Engineering Support dimensions should be immediately disqualified.
Bottom line: Only commit to a new manufacturer after they deliver a detailed DFM report on your files; a factory that highlights design risks before taking your money is a factory you can trust long-term.
What Is the Step-by-Step Process for Transferring PCB Assembly Production?
Transferring PCB assembly production involves a structured 5-phase process: data auditing, prototype validation, parallel production running, inventory migration, and final contract termination. Skipping the parallel run phase is the most dangerous move you can make, as it eliminates your safety net if the new CM hits early production snags.
You cannot just flip a switch and move production overnight. A safe transition requires meticulous planning and a strict adherence to a project timeline.
Phase 1: Data Verification and NDA
First, sign NDAs with the new supplier. Send your complete document package. The new factory will perform their DFM checks and generate a formal quote. During this phase, you are still actively producing boards with your old CM. Do not alert them yet.
Phase 2: The Parallel Run
This is the secret weapon for zero downtime. You place a standard production order with your old CM to build up a 4-to-6-week buffer stock of finished goods. Simultaneously, you place a First Article Inspection (FAI) and a pilot run order with your new CM.
Phase 3: Validation and Ramp-Up
Once the new CM delivers the pilot run, your engineering team tests the boards exhaustively. If they pass, you approve the new CM for volume production. Only at this exact moment do you initiate the formal exit process with your old factory.
The real question is: Who manages the timeline? You must assign an internal project manager whose sole job is to track this transfer. Relying on the sales rep of the new CM to drive your internal validation testing will cause weeks of delays.
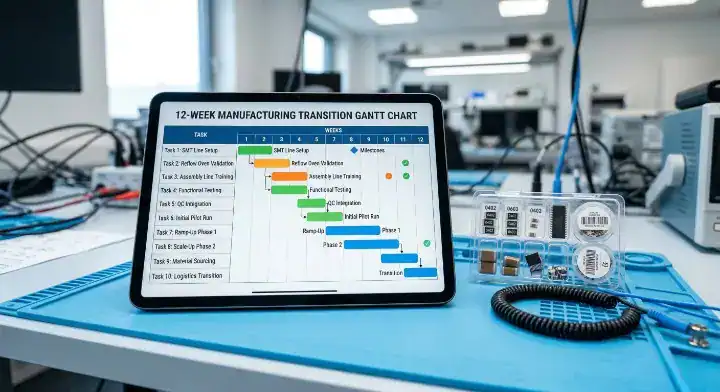
Typical Transition Timeline
| Week | Milestone / Action | Responsible Party |
|---|---|---|
| Week 1-2 | NDA signed, Files transferred, DFM review, Quote approved | OEM & New CM |
| Week 3 | Build 6-week buffer stock at Old CM | OEM (Purchasing) |
| Week 4-6 | First Article Build and Pilot Run at New CM | New CM |
| Week 7-8 | Functional testing of Pilot Run boards | OEM (Engineering) |
| Week 9 | Approve New CM for mass production, Issue formal exit to Old CM | OEM |
| Week 10-12 | Transfer remaining raw inventory and fixtures, Mass production begins | Old CM & New CM |
Keep your old factory running until Week 9; paying for a short period of overlapping production is cheap insurance against a total stockout.
Bottom line: Always run both factories concurrently for at least one production cycle so your revenue stream remains completely protected while you validate the new assembly line.
How Do You Handle Component Inventory and Open Purchase Orders During the Transition?
You must legally audit and claim your proprietary inventory, resolve open purchase orders by absorbing or transferring them, and officially clarify the ownership of expensive test fixtures before closing out your old account. Mishandling your BOM for PCB assembly at this stage often leads to the old factory holding your parts hostage for extortionate “storage and handling” fees.
This is the most legally complex part of the switch. Your old CM likely has thousands of dollars of your components sitting on their shelves. They also have open POs with distributors for parts with 20-week lead times specifically allocated for your product.
The Exit Audit Process
You need to request a detailed, line-by-line inventory report from your current supplier. Cross-reference this against the attrition rates and scrap allowances in your original contract. If they claim they used 10% more microcontrollers than expected due to “setup waste,” demand the physical scrap boards as proof before you pay for the deficit.
Managing Open POs and Buffer Stock Agreements
If you signed a Minimum Order Quantity (MOQ) or buffer stock agreement, you are legally on the hook for those parts. You have three choices:
- Pay the old CM to ship the raw parts to your new CM (ideal).
- Pay a cancellation fee to the old CM’s distributors (if possible).
- Absorb the parts into your own warehouse and consign them to the new CM later.
Factory Veteran View: The Problem: Clients frequently get stuck paying 20% markups on components sitting at their old CM because the old factory refuses to release the stock without a “transfer fee.” Our Solution: We run a parallel component sourcing program during month one of the transition, tapping directly into tier-1 distributors. The Result: This typically replaces 85% of standard parts within two weeks at lower pricing, letting you abandon held-hostage inventory and move forward cleanly.
Stencils and Tooling Ownership
A common question is: “I paid an NRE fee for the solder paste stencil, can I transfer it?” Technically, yes, you own it. Practically, shipping a piece of laser-cut steel across the country, hoping it doesn’t bend, and recalibrating it for a different brand of SMT printer is a waste of time. Cut a new stencil locally at the new CM.
Asset Transfer Protocol
| Asset Type | Ownership Standard | Action During Transfer |
|---|---|---|
| Standard SMT Components | Belongs to whoever purchased it | Source fresh stock with new CM |
| Custom/Proprietary ICs | You (OEM) | Demand physical shipment to New CM |
| Solder Paste Stencils | You (if NRE paid) | Discard/Recycle; cut new ones for $150-$300 |
| ICT / Functional Test Fixtures | You (if NRE paid) | Retrieve immediately; shipping is worth the cost |
| Open Distributor POs | Varies by contract terms | Negotiate transfer of PO to the New CM |
Never assume the old CM will automatically pack and ship your parts; you must explicitly outline the transfer logistics and pay the shipping courier directly to maintain control of the assets.
Bottom line: Abandon cheap standard resistors and capacitors at your old CM, but aggressively secure your custom test fixtures and hard-to-source microcontrollers before signaling your final exit.
How to Run a First Article Build to Validate the New Manufacturer?
Running a first article build requires ordering a micro-batch of 3 to 5 boards from the new manufacturer and putting them through extreme functional and environmental testing before authorizing volume production. You must verify that the new CM can interpret your data accurately without relying on the undocumented habits of your previous supplier.
Even if you provided perfect files, the first article inspection (FAI) is where theory meets reality. Your new factory will be using different solder paste, different reflow oven profiles, and different flux chemistries than your old factory.
The FAI Pass/Fail Criteria
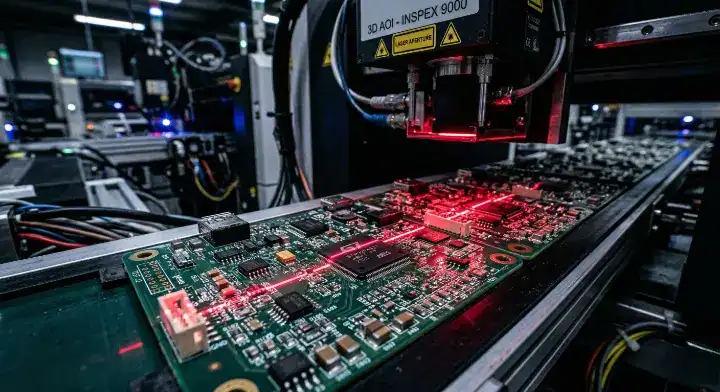
Do not just power the board on to see if the LED lights up. You need to verify the actual manufacturing quality. Check the solder joints under magnification—are they shiny and concave, or dull and grainy? Ask the new CM for the X-Ray images of all Ball Grid Array (BGA) components. If voiding inside the BGA solder balls exceeds 25%, the FAI fails.
Golden Sample vs. New Build Comparison
Provide your new factory with a Golden Sample from your old CM, but strictly for reference. Your engineering team must do a side-by-side tear-down. Measure the impedance on high-speed traces. Weigh the boards to ensure the copper pour matches.
So what does this actually mean for your timeline? It means you must allocate at least a full week of internal engineering time just to test these 5 boards. Do not rush this step to meet a marketing deadline.
Request a free first-article inspection on your first order with us to see our rigorous, documented quality validation process firsthand.
FAI Inspection Requirements
| Inspection Area | Testing Method | Pass/Fail Standard |
|---|---|---|
| Solder Joint Quality | 3D AOI & Visual | No bridges, insufficient solder, or tombstoning |
| BGA Integrity | X-Ray Inspection | Voiding under 25%, zero short circuits |
| Component Placement | Machine verification | 100% match to BOM & Centroid data |
| Electrical Functionality | Bed of Nails / Flying Probe | Passes all designated test points |
| Firmware Flashing | Manual IC Programming | Successful boot sequence, zero fault codes |
If a board fails the FAI, the CM must provide a formal root cause analysis and build a second article run at their own expense before moving forward.
Bottom line: Treat the first article build as a strict pass/fail audit of the new CM’s quality control; if they cannot produce 5 perfect boards, they will never produce 5,000 perfect boards.
What Are the Most Common Mistakes That Cause Downtime During a CM Switch?
The most common mistakes that halt production during a CM switch are failing to transfer the test fixture programming, assuming identical Gerber files equal identical physical boards, and pulling the plug on the old factory before the new line is fully validated. These unforced errors turn a routine 8-week transition into a 6-month supply chain crisis.
Many hardware founders underestimate the complexity of a factory transfer. A customer recently came to us after their previous CM shut down overnight, leaving them with zero test fixtures or documentation, causing their entire production line to freeze.
The “Copy Exact” Illusion
Engineers often believe in “copy exact manufacturing”—the idea that giving two factories the exact same files yields the exact same product. This is a myth. Factory A might use a 5-mil stencil with a specific water-soluble flux, while Factory B uses a 4-mil stencil with no-clean flux. These hidden parameter shifts can drastically alter the impedance and reliability of high-frequency RF boards.
Emergency Transfer Protocols
If your old CM goes bankrupt or abruptly refuses to ship product, you are in an emergency transfer scenario. In this case, you skip the parallel run. You must immediately source raw bare boards locally on a 24-hour turn, air-freight alternative components from brokers, and accept higher prototype costs to get the line moving again.
Factory Veteran View: The Problem: Customers moving complex boards forget to transfer the custom In-Circuit Test (ICT) code, realizing only at the final assembly stage that the new CM has no way to verify functionality. Our Solution: We reverse-engineer functional test requirements directly from passing Golden Sample boards within 48 hours using flying probe testers. The Result: This salvages the production run instantly, preventing a total shipment freeze and maintaining a 99.7% first-pass yield rate even without legacy data.
Top Transfer Mistakes & Immediate Fixes
| Critical Mistake | Real-World Consequence | How to Fix/Prevent It |
|---|---|---|
| Leaving Test Fixtures behind | Cannot verify finished boards; 4-week delay | Demand physical return of all custom test rigs |
| Ignoring Alternate Part Approvals | Production stalls waiting for 1 specific resistor | Establish a pre-approved Component AVL upfront |
| Abruptly firing the old CM | Total inventory stockout during transition | Maintain a 4-week overlap (Parallel Run) |
| Refusing to cut new stencils | Poor solder paste release, high defect rates | Pay $200 for fresh, laser-cut stencils locally |
| Skipping the FAI phase | 1,000 boards built with reversed polarized caps | Mandate a strict 5-board pilot run validation |
Do not assume the new CM automatically knows how to test your product; you must provide explicit, written testing procedures alongside your hardware files.
Bottom line: Document every single manual workaround your old factory used on the shop floor, and enforce a strict parallel production run to absorb any shocks during the transition.
How Long Does a Typical PCB Assembly Transfer Take?
A standard PCB assembly transfer takes roughly 8 to 12 weeks from the moment you sign the NDA to the delivery of your first mass-production batch. The timeline is heavily dictated by component lead times and how quickly your internal engineering team can validate the first article pilot run.
Switching manufacturers is an investment of both time and money. You will incur overlapping costs during the transition period.
Understanding the Financial Impact
You should expect to pay Non-Recurring Engineering (NRE) fees twice. You paid them to your old CM, and you will pay them to your new CM for stencil creation, SMT machine programming, and basic tooling. For a moderately complex board, expect this to range between $1,000 and $3,500.
Want the honest answer? If you are switching because of quality issues, this upfront cost pays for itself within the first two production runs simply by eliminating the manual rework and RMAs you were previously funding.
Expected Transfer Cost Breakdown
| Expense Category | Typical Cost Range | Who Pays? |
|---|---|---|
| NRE / Machine Programming | $500 – $1,500 | You (OEM) |
| Solder Paste Stencils | $150 – $300 per side | You (OEM) |
| First Article Build (Parts + Labor) | Standard Prototype Pricing | You (OEM) |
| Test Fixture Recreation (If lost) | $2,000 – $5,000+ | You (OEM) |
| Inventory Shipping / Freight | Variable based on weight | You (OEM) |
If a new CM offers to waive all NRE fees completely to win your business, scrutinize their unit price carefully; they are almost certainly hiding those setup costs in your BOM markup.
Bottom line: Budget roughly $3,000 and 10 weeks of calendar time to execute a safe, fully validated transition to a new assembly partner.
Choosing to transfer your manufacturing shouldn’t mean accepting weeks of downtime and lost revenue. Now you have the exact checklist and timeline to secure your data, execute a parallel run, and move your production safely. At QueenEMS, we manage complete supplier transitions for hardware teams seamlessly, offering a free DFM review on every order, fully transparent pricing, and 3D AOI inspection standard on every board to ensure your first run with us beats your last run with them. We believe every hardware team deserves a manufacturing partner who explains their processes, not hides them. Contact us today to get a detailed transition plan and a side-by-side quote for your project.
Written by the QueenEMS Engineering Team
FAQ
1. Can I legally force my old manufacturer to give me the pick-and-place files? It depends on your initial manufacturing agreement, but generally, no. If you only provided Gerbers and the CM generated the machine-specific centroid and pick-and-place files internally, they own that specific machine data. However, you can easily regenerate this data from your original CAD files or ask your new factory to reverse-engineer it. Get a transparent quote within 24 hours with us to see how easily we handle missing data.
2.What happens if the old factory refuses to ship my remaining components? Yes, this happens frequently. If you have paid for the components outright, it is theft; however, fighting it legally takes longer than the parts are worth. If the parts are standard off-the-shelf items, abandon them and source fresh stock. If they are custom ICs, you may have to pay their requested “handling fee” to release them. Upload your BOM for a free DFM check and let our procurement team find alternate, in-stock components for you immediately.
3.How do I know if the new manufacturer is actually better before signing a long-term contract? You don’t sign a long-term contract until they pass the First Article Inspection (FAI). You protect yourself by strictly ordering a small pilot run of 5-10 units first. If those boards fail your internal testing or their communication is poor during the prototype phase, you walk away with minimal financial loss. Request a free first-article inspection on your first order to validate our 99.7% first-pass yield rate yourself.
Upload your files today · Free DFM check before production · Ship worldwide
Get your PCB prototypes in as fast as 24 hours. We handle FR4, Rogers, and Flex up to 60 layers — free prototypes for 2–4 layer boards, no minimum order.
Just upload your Gerber + BOM — we source every part, assemble, and inspect (AOI + X‑Ray) so you don't have to chase suppliers. Boards ship in as fast as 24 hours.